Visit VMARENA.COM For More Advanced Technical Posts , Learn More .

Sunday, January 21, 2018

VMDK Partitions and disk resizing in VCSA 6.5

Similar to the vCenter Server Appliance (VCSA) 6.0 release, the new VCSA 6.5 is also composed of multiple virtual machine disks (VMDKs). Each VMDK maps to a specific function and OS partition within the VCSA. There are now a total of 12 VMDKs, two of which are new in vSphere 6.5: vSphere Update Manager (VUM) and Image Builder. The following table provides a break down of the VMDKs in VCSA 6.5 compared to VCSA 6.0:
Disk6.0 Size6.5 SizePurposeMount Point
VMDK112GB12GB/ and Boot / and Boot
VMDK21.2GB1.8GBVCSA's RPM packagesN/A as it is not mounted after install
VMDK325GB25GBSwapSWAP
VMDK425GB25GBCore /storage/core
VMDK510GB10GBLog /storage/log
VMDK610GB10GBDB /storage/db
VMDK75GB15GBDBLog /storage/dblog
VMDK810GB10GBSEAT (Stats Events and Tasks) /storage/seat
VMDK91GB1GBNet Dumper /storage/netdump
VMDK1010GB10GBAuto Deploy /storage/autodeploy
VMDK11N/A (Previously InvSrvc 5GB)10GBImage Builder/storage/imagebuilder
VMDK12N/A100GBUpdate Manager /storage/updatemgr
n addition to the VMDK/partition changes, there are a couple of enhancements when needing to increase disk capacity in the VCSA. Just like in VCSA 6.0, you will still be able to hot-extend any one of the VMDKs while the system is still running.
  • The first change is that instead of the old vpxd_servicecfg command which is used expand the logical volume(s) making the new storage capacity available the OS/application, it has been replaced with the following command: /usr/lib/applmgmt/support/scripts/autogrow.sh 
  • The second change is that instead of having to perform the above command using only SSH which may be disabled by default. There is now a new Virtual Appliance Management Interface (VAMI) REST API that can be called remotely: POST /appliance/system/storage/resize
  • The final difference is that in previous releases, you could only resize the Embedded VCSA or External VCSA node, but not the Platform Services Controller (PSC) node. In 6.5, this has changed and you can apply this method on any one of the VCSA nodes. Thanks to Blair for reminding me on this one!
Lets walk through an example of increasing the Net Dumper partition (VMDK9) and exercising this new VAMI API.
Step 1 - Login to VCSA using SSH to run a quick "df -h" to check the current size of your Net Dumper partition which by default will be 1GB as seen in the screenshot below.
increase-disk-capacity-vcsa-6-5-0
Step 2 - Next, we will increase the VMDK to 5GB. In this example, I am using the vSphere Web Client but if you wanted to completely automate this process end-to-end, you can use the vSphere API/PowerCLI to perform this operation.
increase-disk-capacity-vcsa-6-5-1
Step 3 - To quickly try out the new VAMI API, we will use the new vSphere API Explorer that is included in the VSCA 6.5. Simply open a web browser and enter the following URL: https://[VCSA-HOSTNAME]/apiexplorer Select the "appliance" API and then click on the login button and enter your vCenter Server credentials.
increase-disk-capacity-vcsa-6-5-2
Step 4 - Scroll down to the POST /appliance/system/storage/resize operation and expand it. To call this API, just click on the "Try it out" button. If the operation completely successfully, you should see a  200 response as shown in the screenshot below.


Step 3 and 4 can also be called directly through PowerCLI using the new CIS cmdlets (Connect-CisServer & Get-CisService) which exposes the new VAMI APIs. Below is a quick snippet that performs the exact same operation:
Connect-CisServer -Server 192.168.1.150 -User administrator@vsphere.local -Password VMware1!
$diskResize = Get-CisService -Name 'com.vmware.appliance.system.storage'
$diskResize.resize()
Step 5 - Lastly, we can now log back into the VCSA and re-run the "df -h" command to verify we can see the new storage capacity.
increase-disk-capacity-vcsa-6-5-4

VCDB space utilization alarm in vSphere 6.5 - VCSA

In vSphere 6.5, there are lot of improvements to provide customers with greater visibility into the VCDB. Not only can customers get granular into the specific types of data being consumed: Stats, Events, Alarm & Tasks (SEAT), Transaction Log & VC Inventory within the VCDB, but this information can also be easily accessed both from a UI as well as API (using the VAMI REST API) standpoint. The Virtual Appliance Management Interface, better known as the VAMI for the VCSA has received a huge face lift in vSphere 6.5. As you can see from the screenshot below, there is now a Database section which gives you the current utilization of your VCDB. In addition, you can also see how this utilization trends over time for the various data types.
vcdb-space-utilization-vcenter-alarms-1
From a reporting and visibility standpoint, this is great but how do you go about operationalizing this data and ensuring that you do not run into situation where your VCDB is out of space or is close to being out of space? Another improvement that has been made to the VCSA 6.5 is that there is now a default vCenter Server Database Health alarm that will monitor the space utilization of your VCDB.
vcdb-space-utilization-vcenter-alarms-0
The way in this work is that system will check the VCDB space utilization every 15minutes with the following trigger events defined:
  • If the current storage utilization is at 80%, a Warning alarm will be triggered
  • If the current storage utilization is 95%, an Error alarm will be triggered and the action is to shutdown the vCenter Server application to protect the database
These default triggers can be changed by simply editing the following vCenter Server advanced settings: vpxd.vdb.space.errorPercent and vpxd.vdb.space.warningPercent (restart of VC service is not required).
vcdb-space-utilization-vcenter-alarms
Customers can also extend these alarms to send an additional email and/or SNMP trap to their monitoring system so that not only is this visible in the vSphere Web Client but the appropriate administrators can also be notified. The above is just one of the many improvements the VCSA 6.5 has received ..

Mark /Emulate an HDD as SSD in ESXi

Identify the storage device in which you wish to mark as an SSD . Use the following ESXCLI command 
esxcli storage core device list
Above image shows device mpx.vmhba1.C0:T2:L0 shows "Is SSD" parameter as false. 
We can change the mpx.vmhba1.C0:T2:L0 device to SDD  by applying below commands 
esxcli storage nmp satp rule add -s VMW_SATP_LOCAL -d mpx.vmhba1:C0:T2:L0 -o enable_ssd
esxcli storage core claiming reclaim -d mpx.vmhba1:C0:T2:L0
If you want to perform the opposite, add the disable_ssd option. If you receive an error regarding a duplicate rule, you will need to first remove the SATP rule and then re-create with the appropriate option.
esxcli storage nmp satp rule add -s VMW_SATP_LOCAL -d mpx.vmhba1:C0:T1:L0 -o disable_ssd
esxcli storage core claiming reclaim -d mpx.vmhba1:C0:T1:L0
Note :- If you are running Nested Virtualization and the virtual disk of that VM is stored on an actual SSD, that virtual disk will automatically show as SSD  .

Tuesday, January 9, 2018

VCSA Deployment Error: Time Out of Sync

 This issue is during the Stage 2 of the vCenter Server Appliance (VCSA) installation with an external Platform Services Controller (PSC).
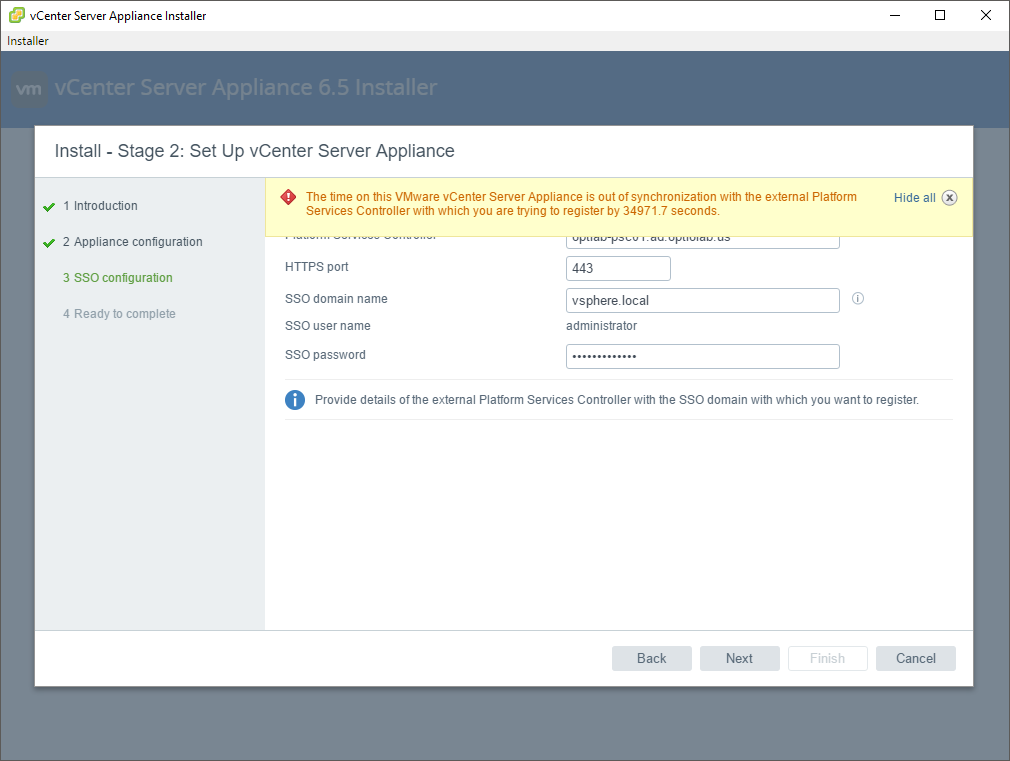
The time on this VMware vCenter Server Appliance is out of synchronization with the external Platform Services Controller with which you are trying to register by 34971.7 seconds.
VCSA Install Stage 2 Error

Login to  VCSA via SSH to begin troubleshooting the issue. After gaining shell access, I immediately launched a date command to view the system time. Found that time is not Correct .


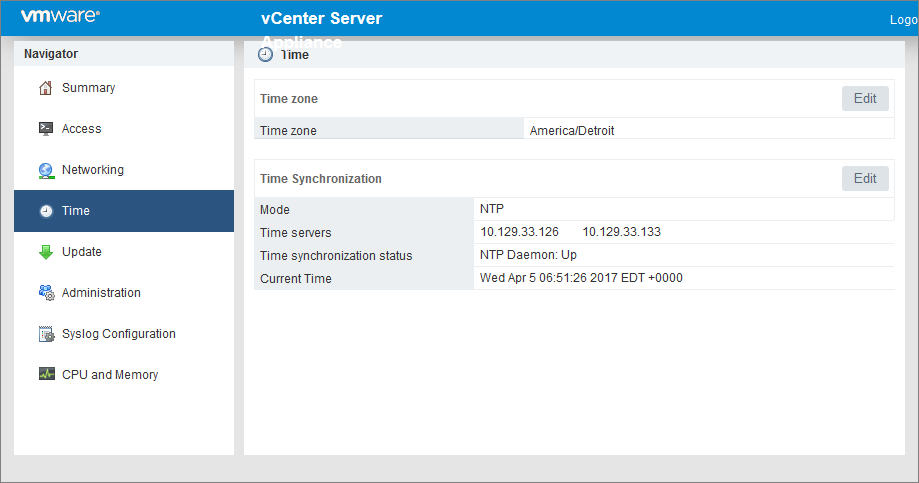
Connecting to the PSC via SSH, gaining shell access, and launching the same date command gives me a very different time–one that matches my workstation. Let’s look into the Appliance Management interface of the PSC (https://hostname.domainname:5840).
NTP settings of the PSC in the Appliance Management interface
Solution 
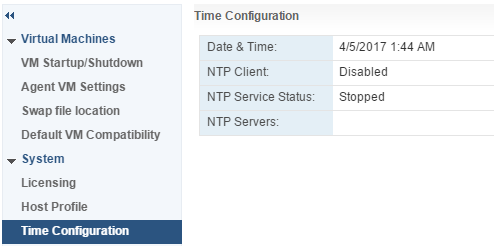
Login to ESXi host and change the NTP setting and wait for some time issue will resolve .
Time settings of ESXi host

Monday, January 8, 2018

Vsphere 6.5 ,VMware VM Storage Policies

VMware Virtual Machine Storage Policies fall under the realm of Storage Policy Based Management that assists with virtual machine provisioning. When defined, Storage Based Policies define which type(s) of storage are presented for the virtual machine and how the virtual machine is placed within storage and also data services. There are certain builtin storage policies that are provided as default selections. However, built-in VASA providers can present storage based on vendor capabilities and functionality and also we can create and assign custom storage policies as well. With custom VM storage policies we can “tag” storage with certain tag metadata so that VMs are placed accordingly to the levels of service our application requires based on tags we define. 

Create Tags Category and Tags to Assign to Storage

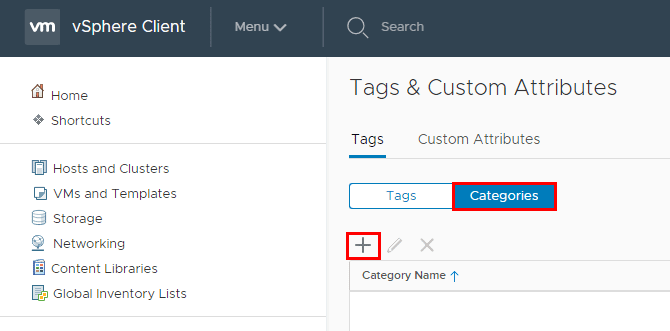
Our first step to using storage policies if we want to tag our datastores with custom metadata that we define is to create tag category and tags.  First we select to create a new tag category.  Click the Categories button and the + sign.
Create-a-new-Tag-category Using VMware VM Storage Policies
Configure Storage IO control options
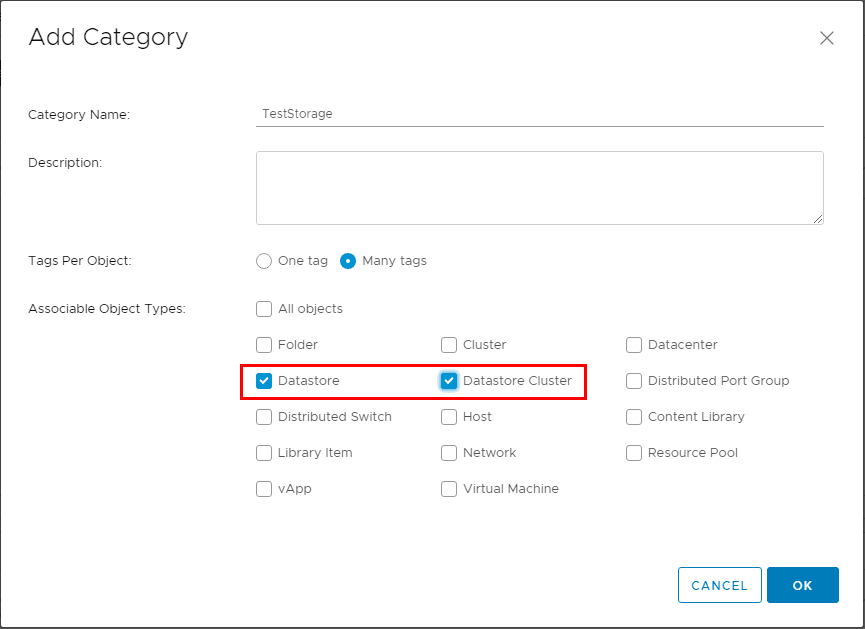
Here we need to define the tag category to include object types Datastore and Datastore Cluster.
Add-objects-to-Tag-category Using VMware VM Storage Policies
Add objects to Tag category
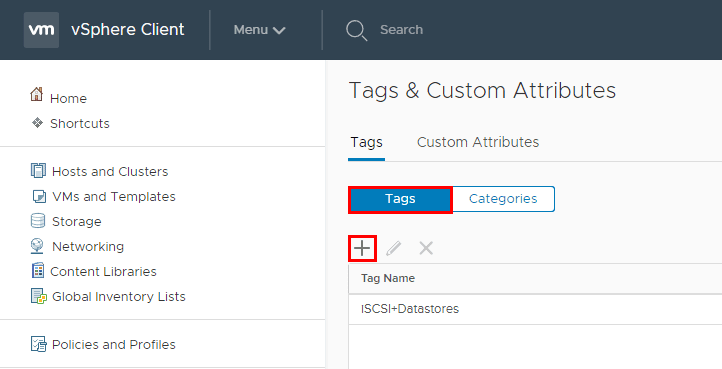
Now that we have our tag category defined, we can create a new tag.  I am simply calling the tag iSCSI+datastore for the lab.
Create-a-new-Tag Using VMware VM Storage Policies
Create a new Tag
Now that we have our tag category and tags in place, we can tag our Datastore(s) with specific tags that we want to use to define our policy.

Tag the VMware vSphere Datastore(s)

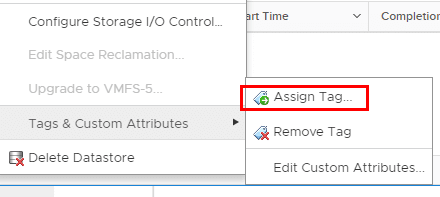
Now we will assign the new tag to the datastore of our choosing.  Right click your datastore and select the Assign Tag option from the Tags & Custom Attributes menu option.
Select-to-tag-a-datastore Using VMware VM Storage Policies
Select to tag a datastore
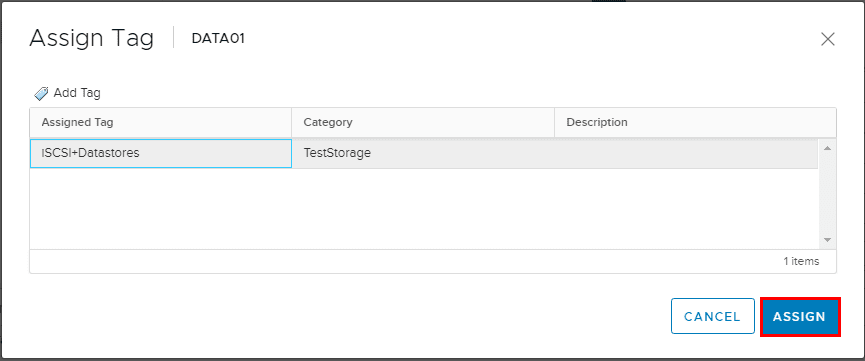
Now, we select our tag we created.
Select-the-tag-to-assign-to-the-datastore Using VMware VM Storage Policies
Select the tag to assign to the datastore

Creating VMware Virtual Machine Storage Policies

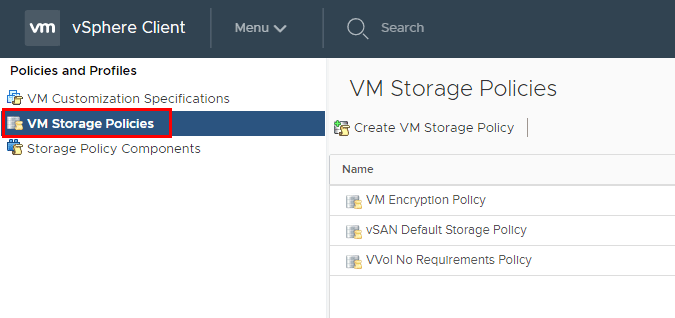
The process to create VMware virtual machine storage policies is fairly straightforward.  In this walkthrough, I will be using the HTML5 web client to create the policy.  The first thing we do is navigate to Menu >> Policies and Profiles in the web client, or the Home button >> Polices and Profiles.
Create-a-New-VM-Storage-Policy Using VMware VM Storage Policies
Create a New VM Storage Policy
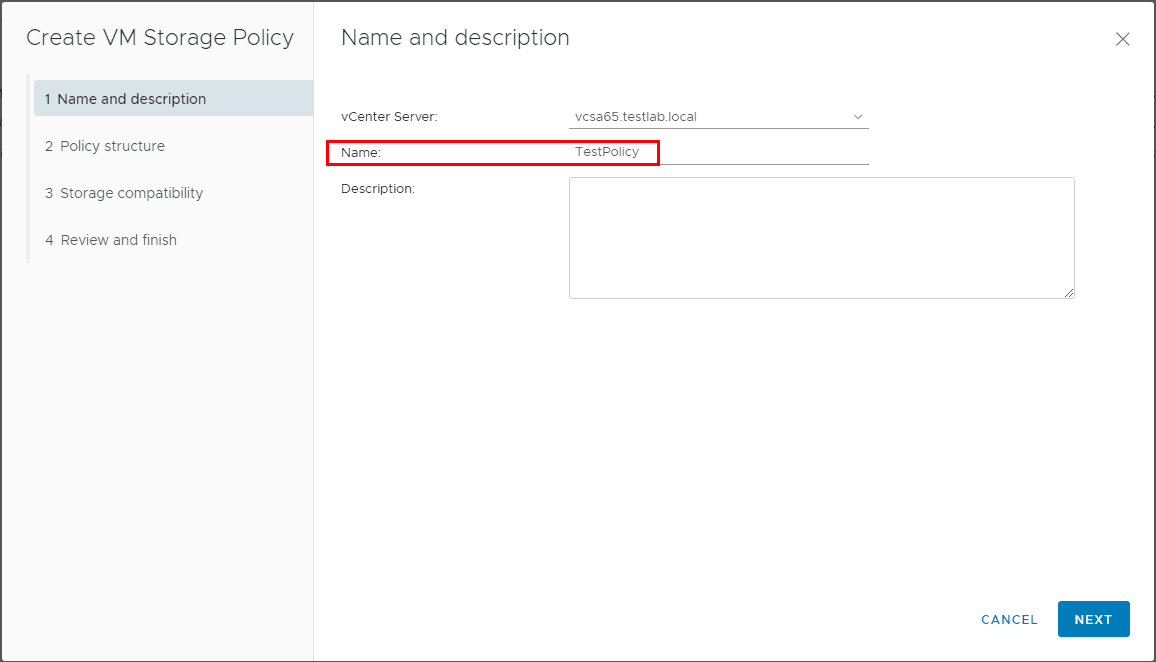
In Step 1, we add a name and description to our new VM storage policy.
Choose-Name-and-Description-for-New-VM-Storage-Policy Using VMware VM Storage Policies
Choose Name and Description for New VM Storage Policy

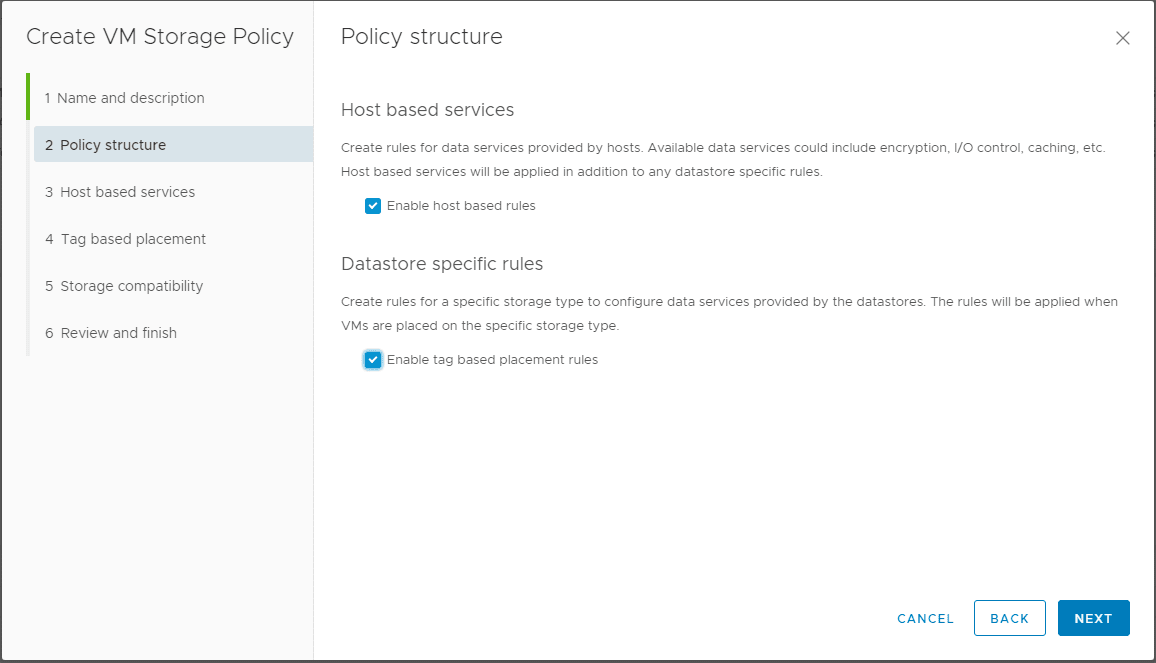
Next we select either Host based services or Datastore specific rules, or both.  Here I have both selected.
  • Host based services – Create rules for data services provided by hosts including encryption and I/O control
  • Datastore specific rules – Rules for different storage types, these can come from VASA or custom tags.  Note about VASA – The list of storage capabilities that a storage array can deliver is defined and published by the storage array’s storage provider service. Using vStorage APIs for Storage Awareness VASA the storage prividers inform vCenter Server about the specific storage device characteristics and capabilities. These are vendor specific.
Select-Host-based-services-datastore-specific-rules Using VMware VM Storage Policies
Select Host based services datastore specific rules
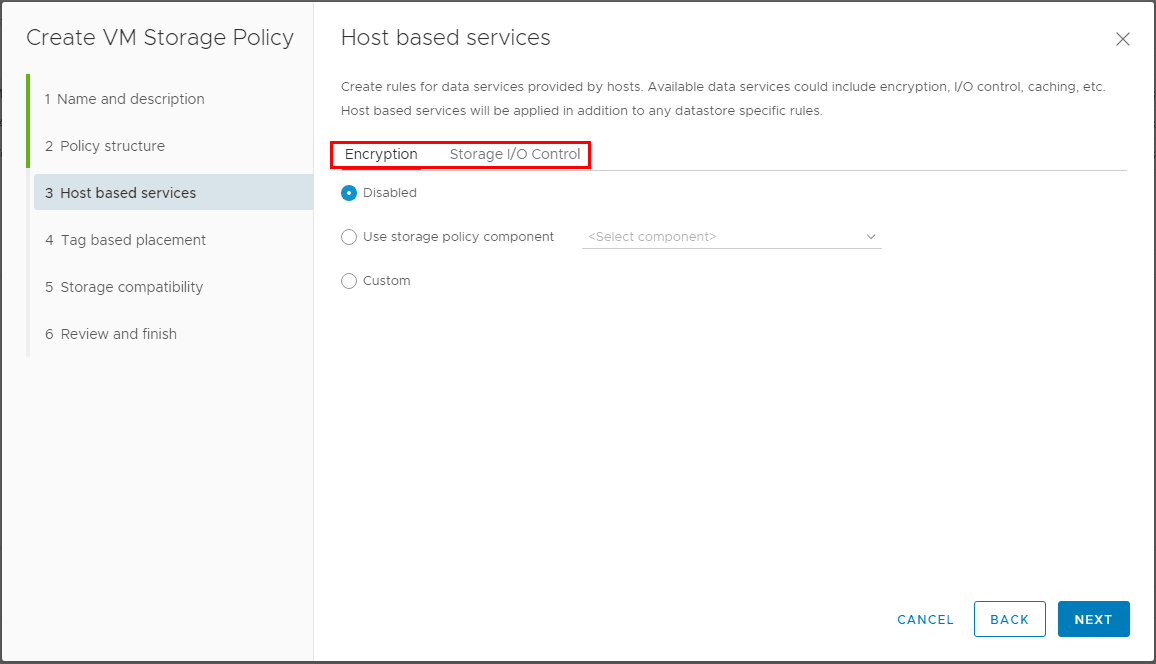
Under the Host based services, we can configure options for Encryption or Storage I/O control.
Select-Encryption-options Using VMware VM Storage Policies
Select Encryption options
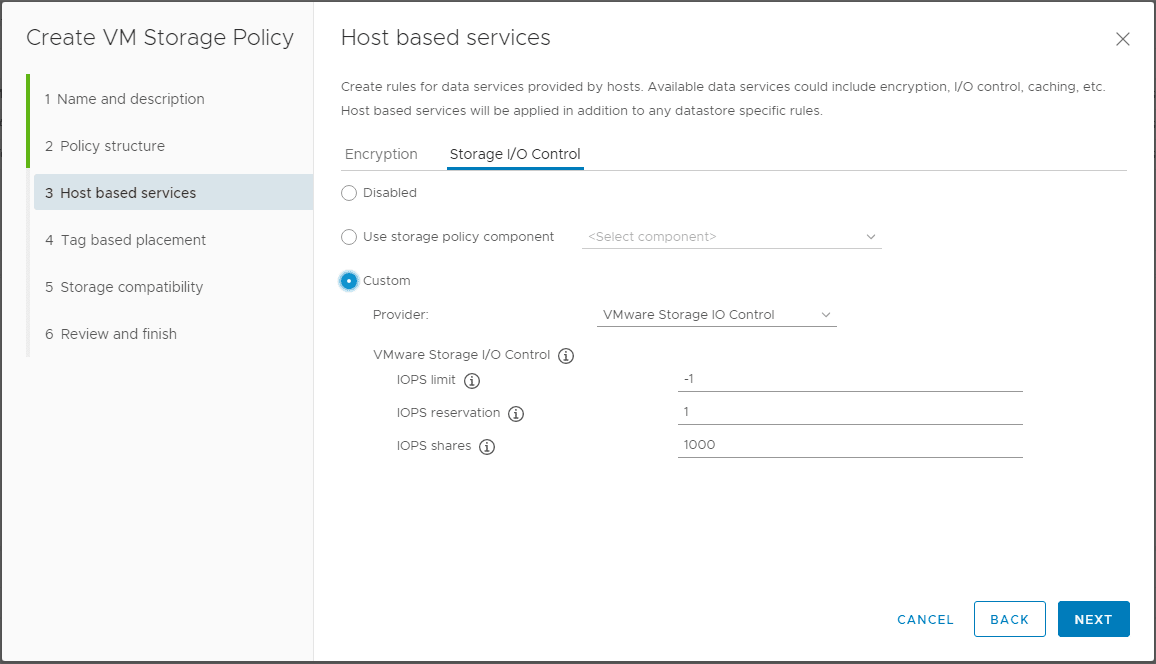
I configured a custom Storage I/O Control using the default values provided.
Configure-Storage-IO-control-options Using VMware VM Storage Policies
Configure Storage IO control options
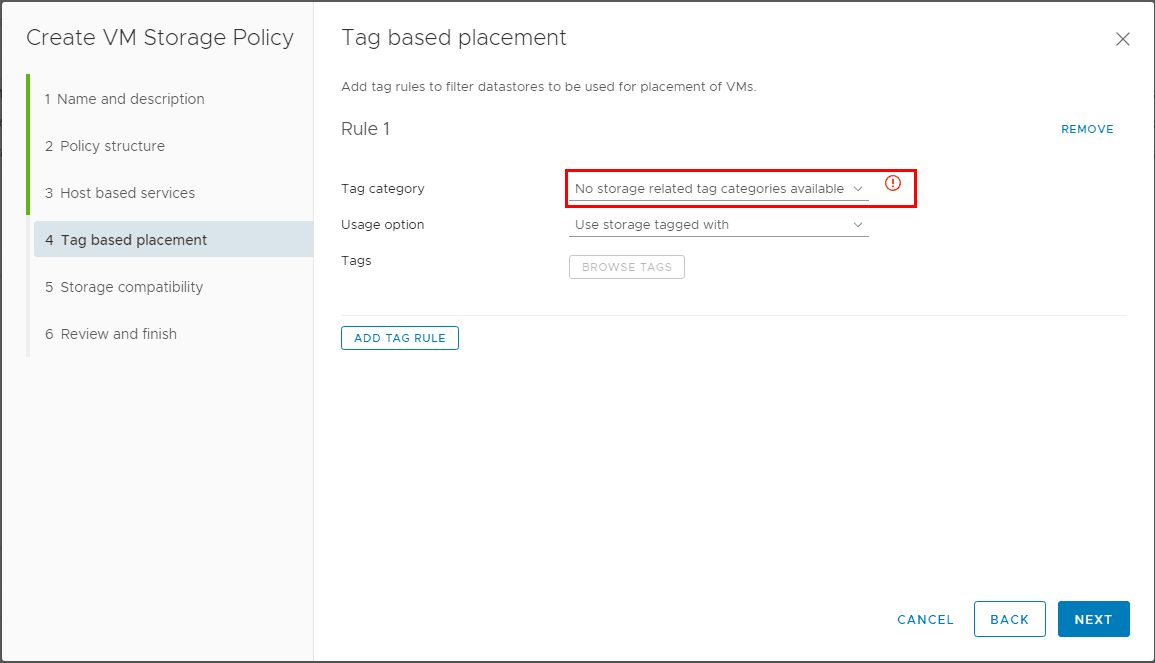
***Note*** If you don’t have any storage related tag categories defined, you will see the error on the Tag based placement screen showing No storage related tag categories available.
Error-if-no-storage-related-tags Using VMware VM Storage Policies
Error if no storage related tags
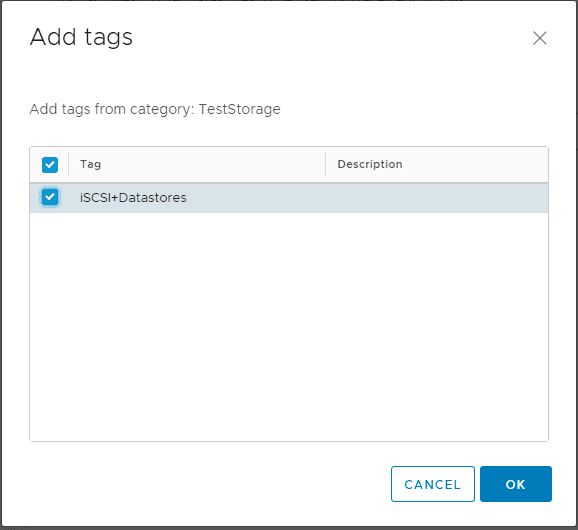
However, once we have the tag category and tags in place, we can add the tag we created earlier.
Adding-our-storage-tag-to-the-policy Using VMware VM Storage Policies
Adding our storage tag to the policy
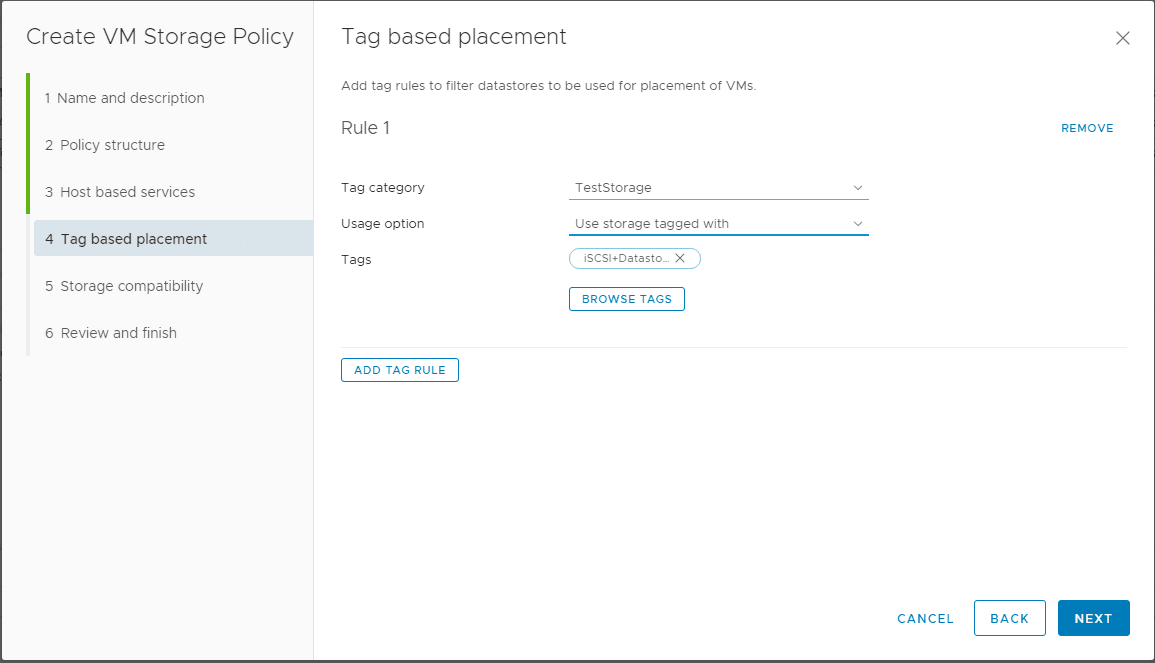
Now we have defined our tag category and Usage option along with defined tags.
After-choosing-our-tag-category-and-storage-tags Using VMware VM Storage Policies
After choosing our tag category and storage tags
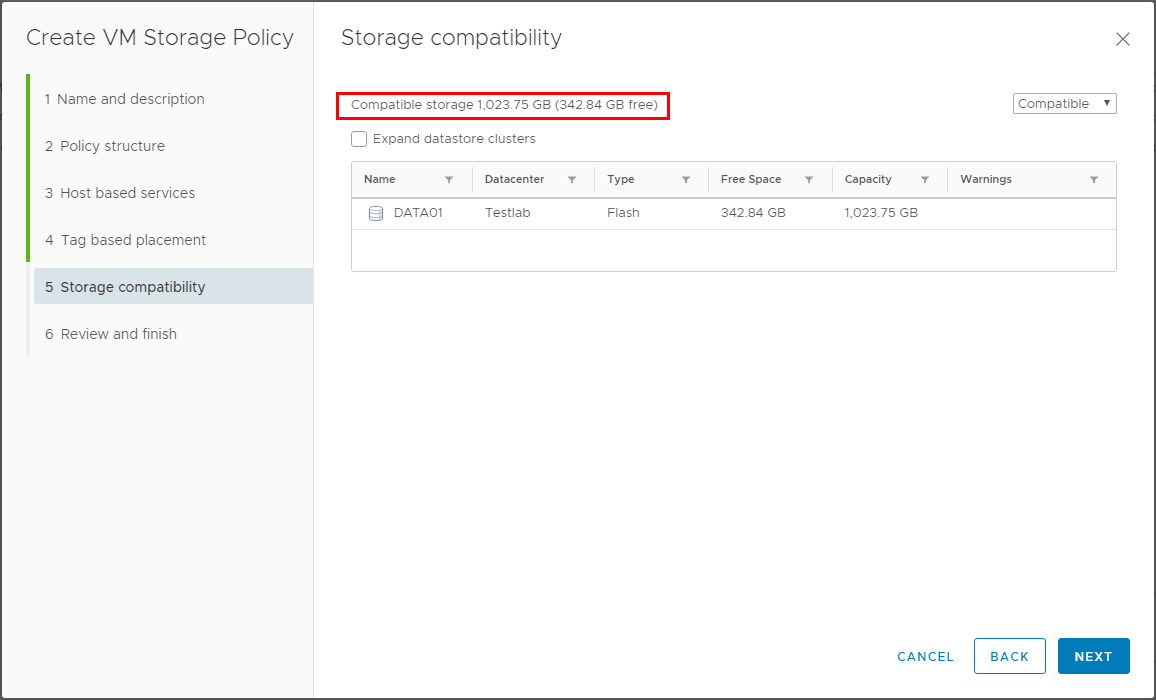
Since we tagged our storage earlier with the custom storage tag, we see it listed in the Compatible storage.
Storage-compatiblity-is-shown Using VMware VM Storage Policies
Storage compatibility is shown
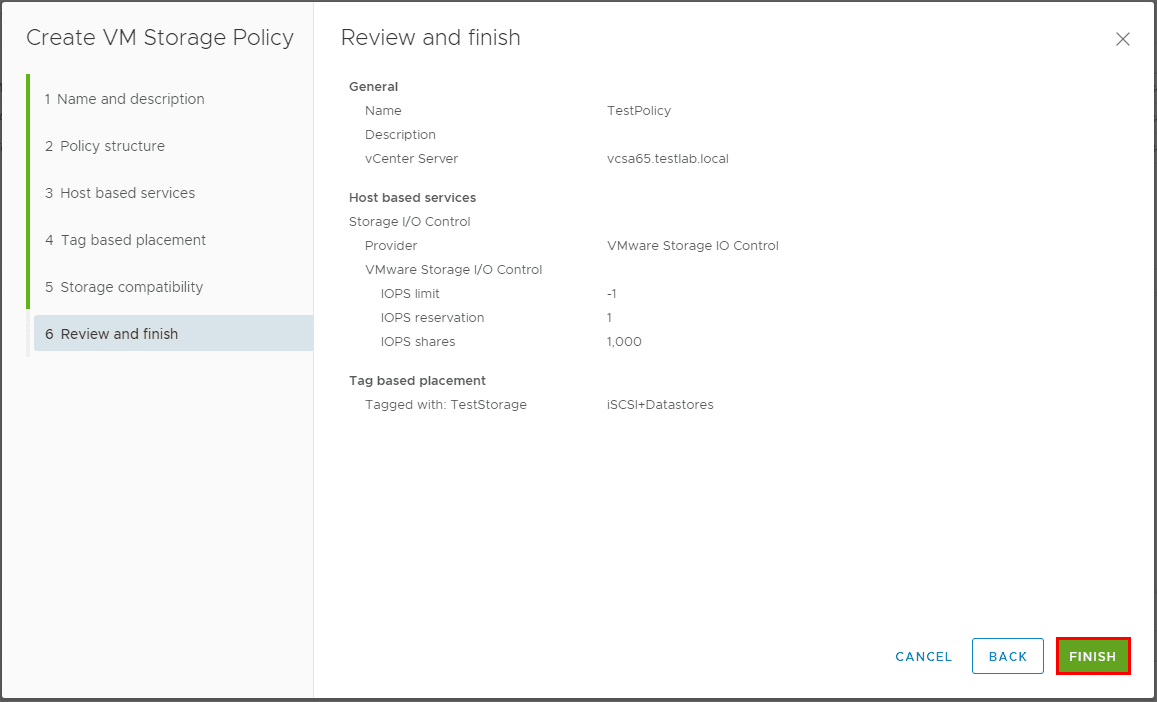
Finally, we review the custom VM Storage Policy we are about to create.
Finish-creating-the-new-VM-storage-policy Using VMware VM Storage Policies
Finish creating the new VM storage policy

Using VMware VM Storage Policies

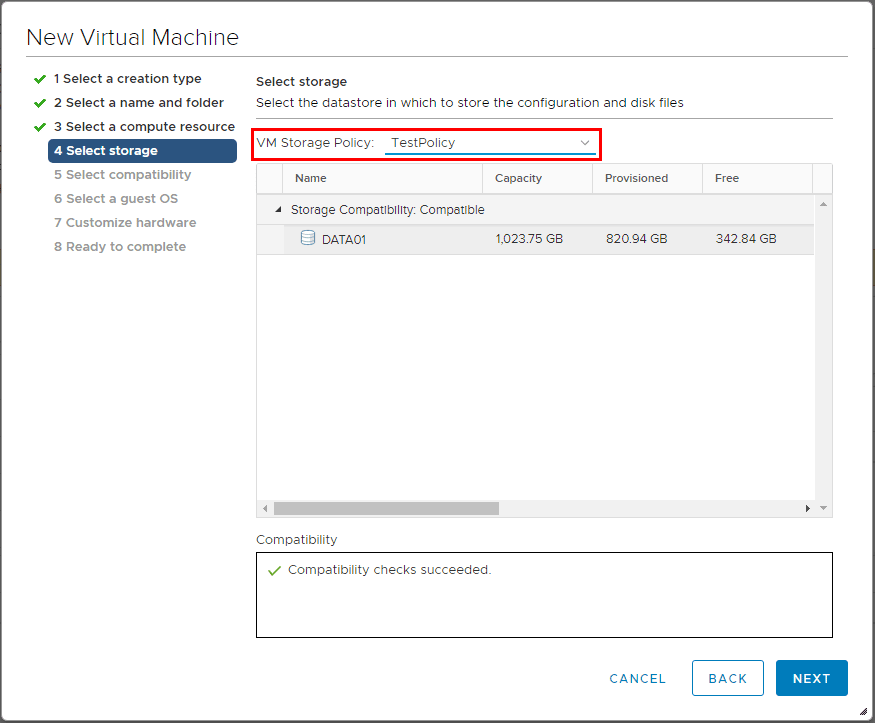
As we can see below, when we get to the Select storage screen, we can select the custom VM Storage Policy which results in the compatible datastore.
Using-storage-policy-with-new-virtual-machine-creation Using VMware VM Storage Policies
Using storage policy with new virtual machine creation

4k Drive Support in VMware ESXi 6.5

One of the new features and functionality that is probably getting overlooked with the other great functionality that is out in vSphere 6.5, is VMware ESXi 6.5 4k 512e drive support.  Let’s take a look at some of the details of this and other new storage features.
vmfsfeat1 VMware ESXi 6.5 4k Drive Support

VMware ESXi 6.5 4k Drive Support

As we all know, the extremely large capacity drives that are being sold now are either 512e or 4kn drives.  If you want anything over around 6TB it seems that is the breaking point to go over to 512e or 4kn.  Up until vSphere 6.5, these drives were unsupported and you would have issues formatting your datastores with VMFS
They use what is called Advanced Format (AF) drives.  They use a large physical sector size of 4096 bytes.  Most importantly perhaps is the main reason behind this is the reliability improvements from moving to the larger physical sectors along with the size enhancements.  The ROI on these size and format drives are also beneficial as the price for the storage sizes are lower than traditional non advanced formatted drives.  the caveat here at least with the GA release of 6.5 is that it only supports 512e mode which means the 4k sectors emulate the 512 bytes for the drive.  However, before this was not supported and now is.  We can only expect the support to come along for the true 4k native formatting which no doubt will be in a future major update release if not a patch perhaps.
This table compares native 512-byte sectors to the new advanced formats:
Format
Logical Sector Size
Physical Sector Size
512n
512
512
512e
512
4,096
4Kn
4,096
4,096

A requirement also for this support is the datastore is formatted with VMFS version 6.  This is the new VMFS version that has been released with vSphere 6.5.  Unfortunately, there is no upgrade of a VMFS 5 datastore to VMFS 6.  You have to reformat the drive or create a new datastore and move VMs over to the newly VMFS 6 formatted datastore.