To view this post Check VMarena
Friday, June 8, 2018
Thursday, May 17, 2018
Saturday, May 5, 2018
Friday, April 27, 2018
Wednesday, April 25, 2018
Friday, April 6, 2018
Monday, April 2, 2018
Wednesday, March 28, 2018
Monday, March 26, 2018
Sunday, March 25, 2018
Thursday, March 22, 2018
Tuesday, March 20, 2018
Sunday, March 18, 2018
Thursday, March 8, 2018
Wednesday, February 28, 2018
Tuesday, February 27, 2018
Monday, February 26, 2018
Thursday, February 22, 2018
Sunday, February 18, 2018
Wednesday, February 14, 2018
Virtual Network Management in Standard Switch Using Power CLI
Visit VMarena to view the Post and Learn
Sunday, February 11, 2018
Monday, February 5, 2018
Updated Version of https://vmarena.blogspot.ae/ - http://vmarena.com/
Hi Everyone ,
I have launched updated Version of my blog site https://vmarena.blogspot.ae/
New Web Site http://vmarena.com/
Keep Learning and Share Posts
I have launched updated Version of my blog site https://vmarena.blogspot.ae/
New Web Site http://vmarena.com/
Keep Learning and Share Posts
Sunday, January 21, 2018
Install VMware VCSA Security Patches
As we have detailed on previous posts, VMware is committed to using Photon OS in just about all the appliances that are being deployed with various products now. The new vCenter Server appliance is a case in point to that. Since Photon OS is a custom built OS from VMware, they can achieve a much more aggressive patch/support schedule. This is a great change from a security perspective as historically, VCSA patches when running on SuSE were not released that often. VMware has documented in their security response policy that patch releases will be based on the vulnerability severity. Let’s take a look at how to install VMware VCSA vCenter appliance Photon OS security patches.
Install VMware VCSA Security Patches GUI
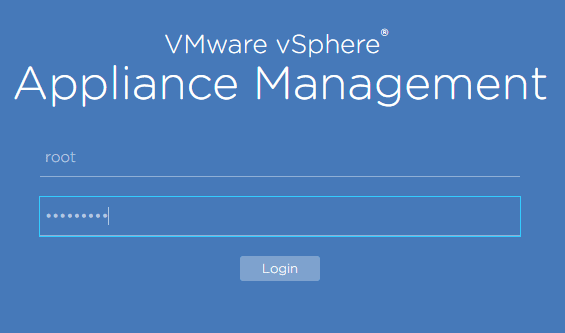
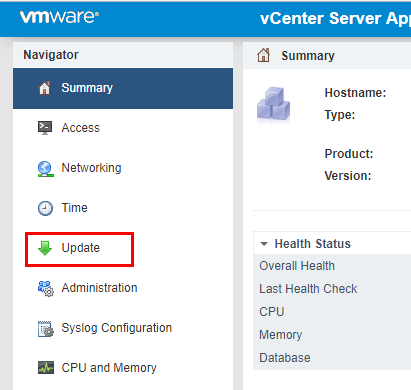
The method that most will be familiar with in patching a VCSA appliance is from the GUI interface. We can get to the Update functionality by browsing out to the VAMI interface https://<your vcenter IP>:5480. Choose the Update menu option.
VCSA patch login to VAMI
Select the Update option.
VCSA VAMI GUI patch install
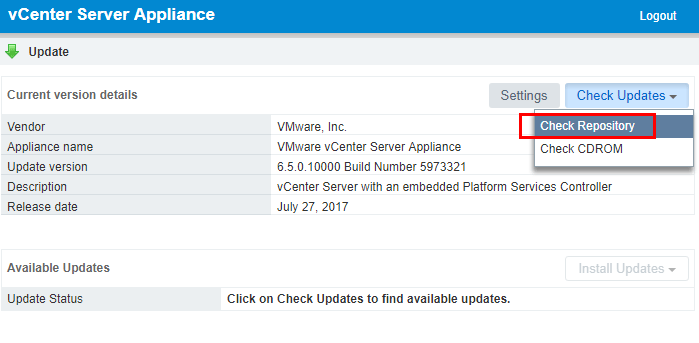
Under the Check Updates menu, click the Check Repository option. This will pull updates from the online VCSA update repository.
Check online repository for patches updates
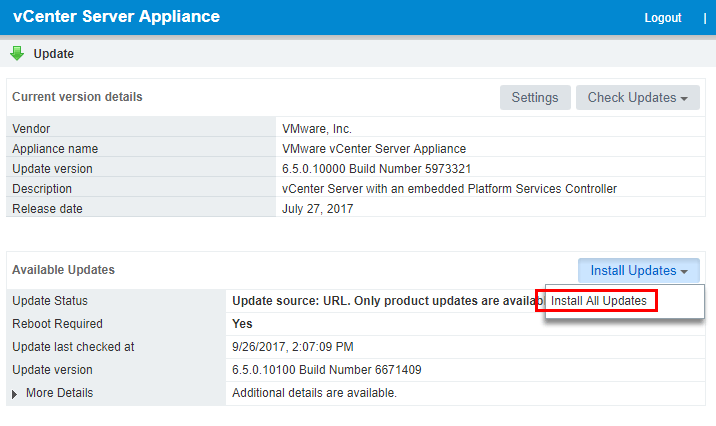
As shown below, the 6.5.0.10100 Build Number 6671409 update is available. We can choose to Install All Updates.
Choose to Install All Updates
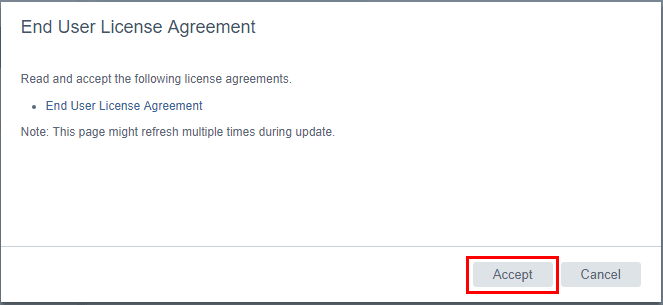
We will be presented with the EULA for the update. Click the Accept button.
Accept the End User License Agreement
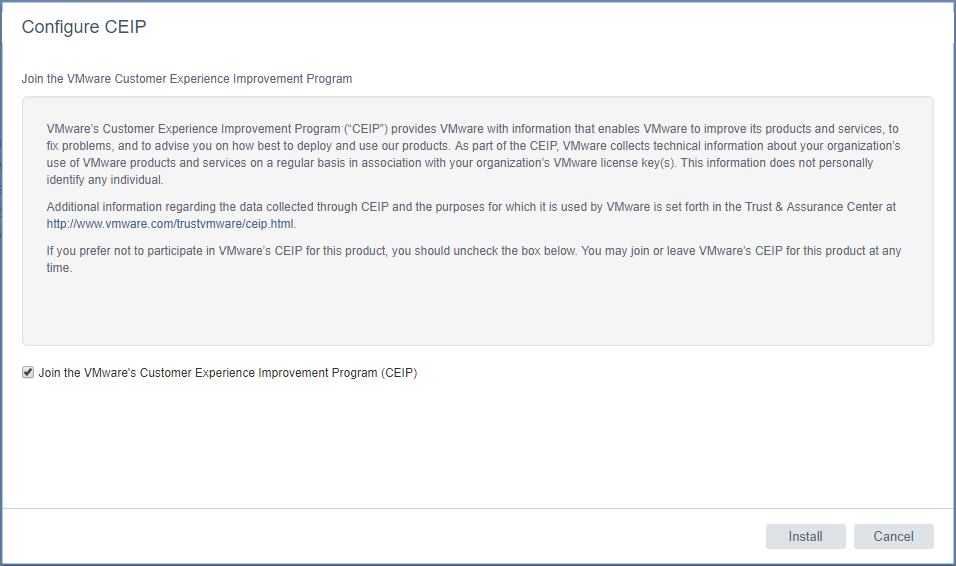
You can choose whether or not you want to join the CEIP program by checking or unchecking the box. Then click the Install button.
Configure the CEIP options
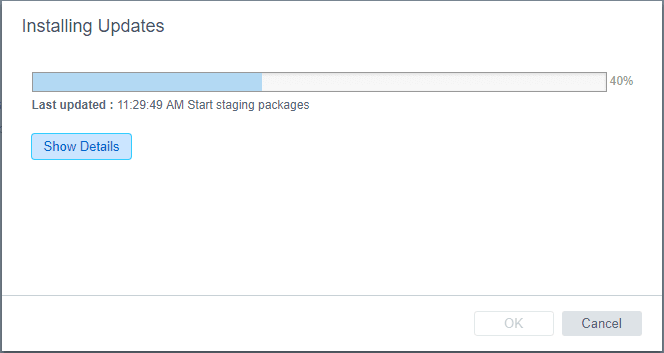
The patches are staged for installation.
VCSA patch GUI start staging patches
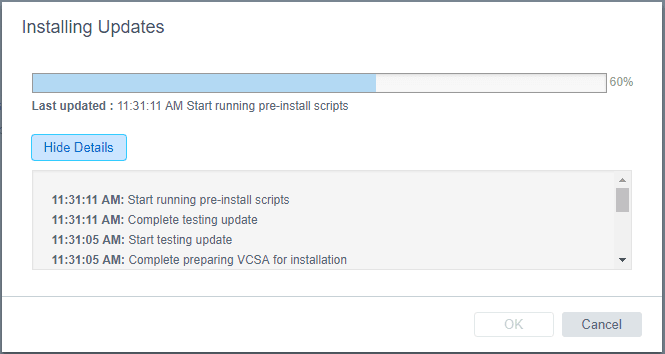
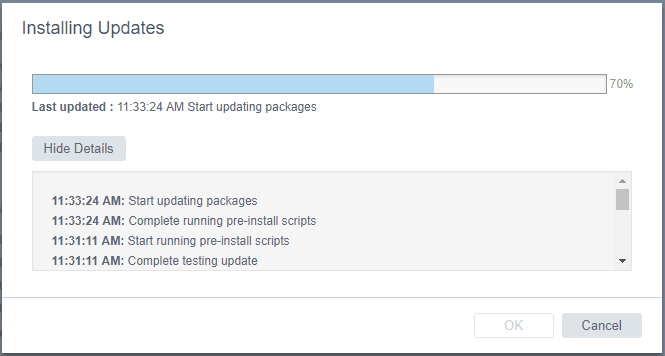
The update process runs a few pre-install scripts. You can select the Show Details button to reveal the specifics of the process.
Update GUI pre-install scripts running
The packages will begin updating after the pre-install scripts run.
Package updates start on VCSA appliance
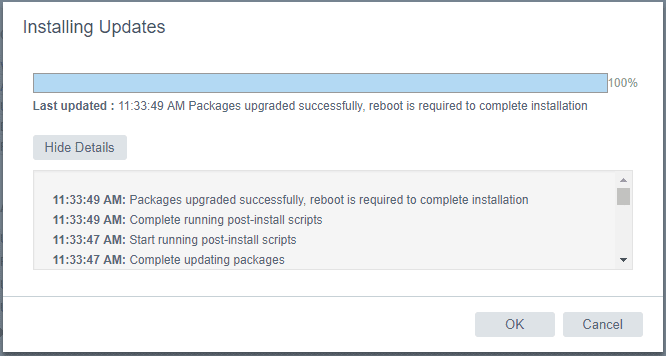
After the update is finished, you will see the message that a reboot is required to complete installation.
Security patches applied successfully reboot pending
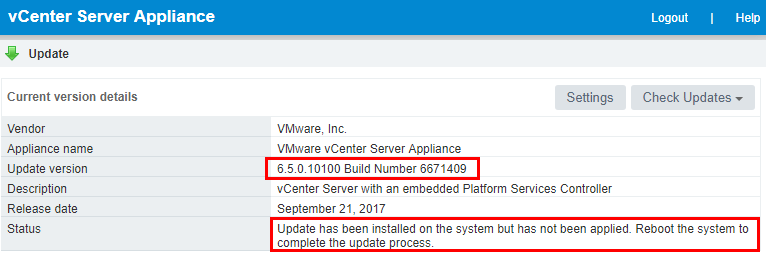
If we go back to the Update menu, we will see the current build number is showing now, however, we still see the reboot directive.
Current build shown reboot
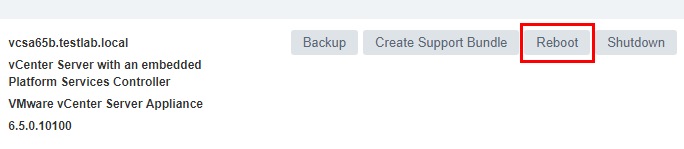
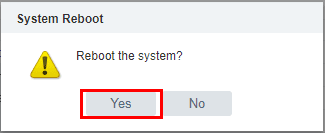
We can easily reboot from the VAMI interface, by going to the Summary tab and selecting the Rebootoption.
VAMI Summary tab select reboot
Select Yes on the reboot the system directive.
Confirm VCSA reboot
Install VMware VCSA Security Patches Command Line
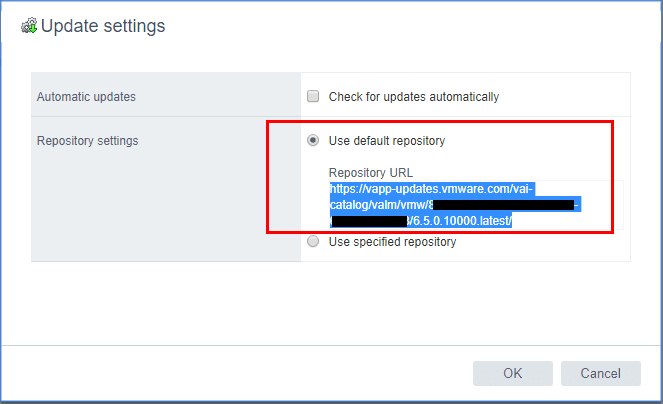
A very easy and powerful way to install patches to VMware VCSA appliance is by using the command line. We can pull the updates directly from the VMware online repository as well. We can find the URL for patching from the online repository by logging into the VCSA VAMI interface https://<your vcenter IP>:5480 and choosing Update >> Settings. Under the Repository Settings you will see the URL for the online repository. We can copy that and use it from the command line.
Get the Default Repository URL for updating
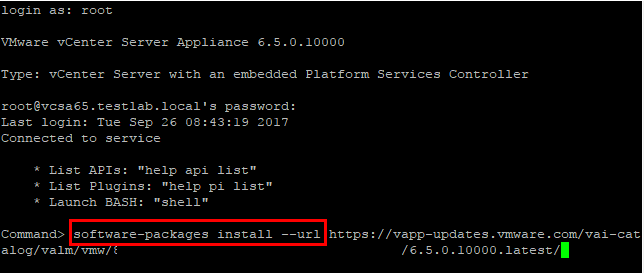
Login via SSH to your VCSA appliance. Make sure your shell is set to the default appliance shell. We will use the software-packages install –url command to stage and install the patches. We use the URL we copied from the VAMI interface Update settings.
Pull patches from the online default patch repository
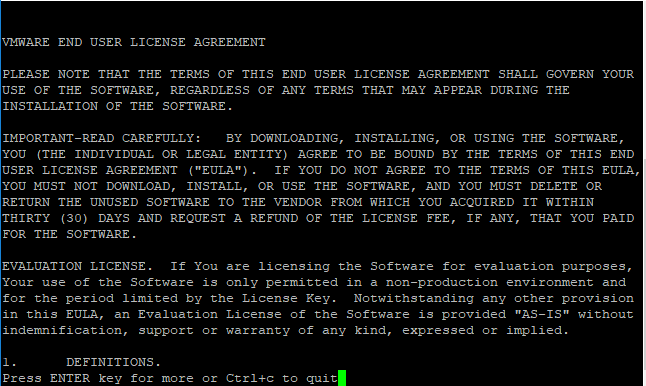
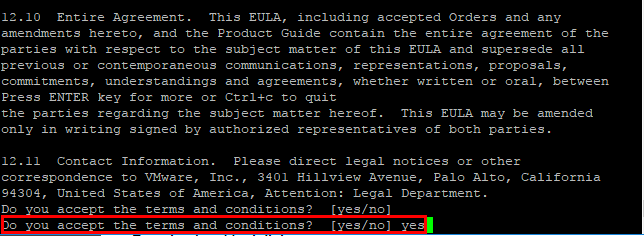
We will see the EULA presented from the command line. You can also use the following command to accept the EULAs automatically:
Accept the license agreement
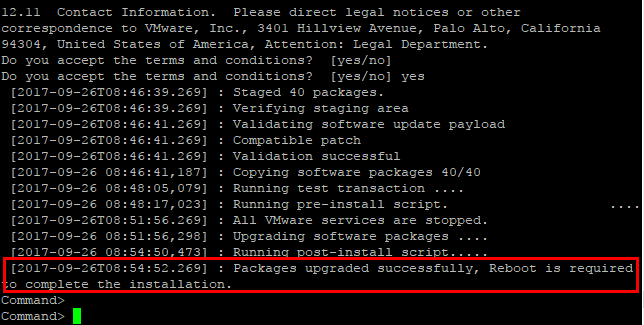
After the EULA, we type out yes to the “Do you accept the terms and conditions?” question.
Type yes at the license agreement
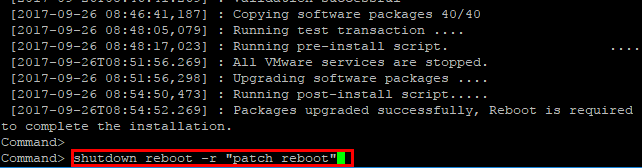
VCSA 6.5 patches are applied reboot system
Enter the shutdown reboot command with reason
After the reboot of the VCSA 6.5 appliance, we will have the latest patches/security patches installed.
Paravirtual to NVMe Virtual Storage Controller in vSphere 6.5
The virtual storage controllers that are presented to a virtual machine can impact the performance of those VMs greatly. New to vSphere 6.5, we have the availability of NVMe virtual storage controllers. NVMe as a storage technology is a great leap forward for performance. With NVMe the storage has direct access to the PCIe bus. With the required virtual machine hardware version 13, you can utilize the new NVMe controller on your virtual machine.
NVMe virtual storage controller requirements
The requirements of the NVMe virtual storage controller include the above mentioned Virtual machine hardware version 13. Additionally, the guest operating system must include one of the following operating systems as taken from VMware KB 2147714.
- Windows 7 and 2008 R2 (hot fix required: https://support.microsoft.com/en-us/kb/2990941)
- Windows 8.1, 2012 R2, 10, 2016
- RHEL, CentOS, NeoKylin 6.5 and later
- Oracle Linux 6.5 and later
- Ubuntu 13.10 and later
- SLE 11 SP4 and later
- Solaris 11.3 and later
- FreeBSD 10.1 and later
- Mac OS X 10.10.3 and later
- Debian 8.0 and later
Change Paravirtual to NVMe virtual storage controller in vSphere 6.5
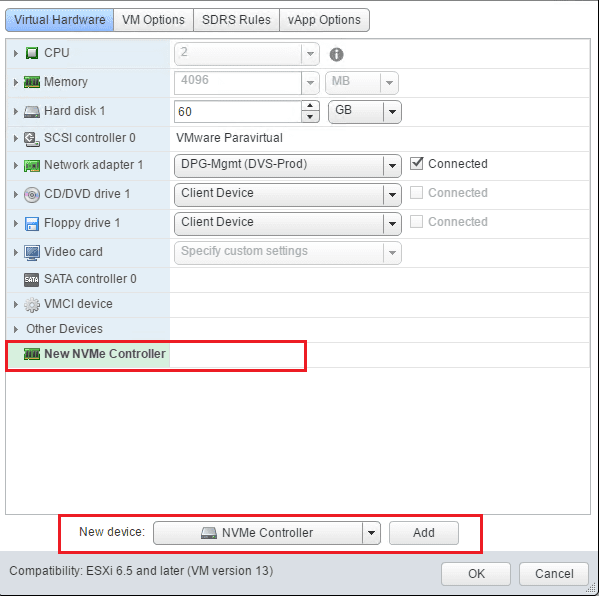
We can in an order of operations change over to the NVMe virtual storage controller on a compatible OS by:
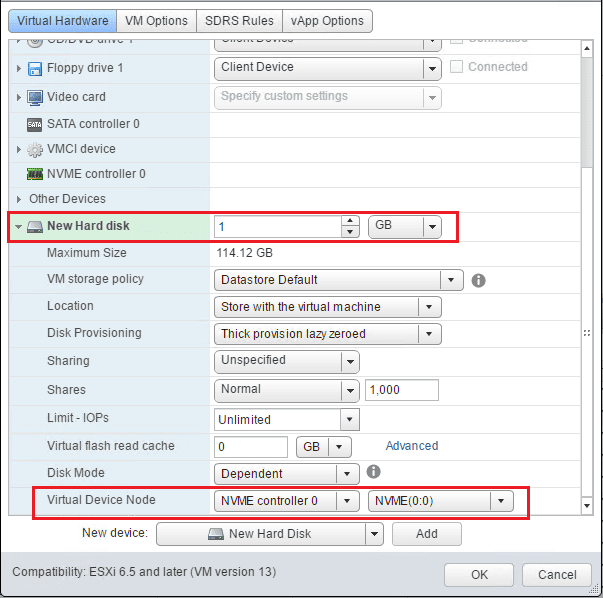
- Adding the new NVMe Controller
- Adding a new temporary hard drive attached to the NVMe controller
- Allowing the operating system to install the storage controller driver for the new NVMe virtual storage controller
- Powering down the VM
- Changing the boot drive controller to the new NVMe controller
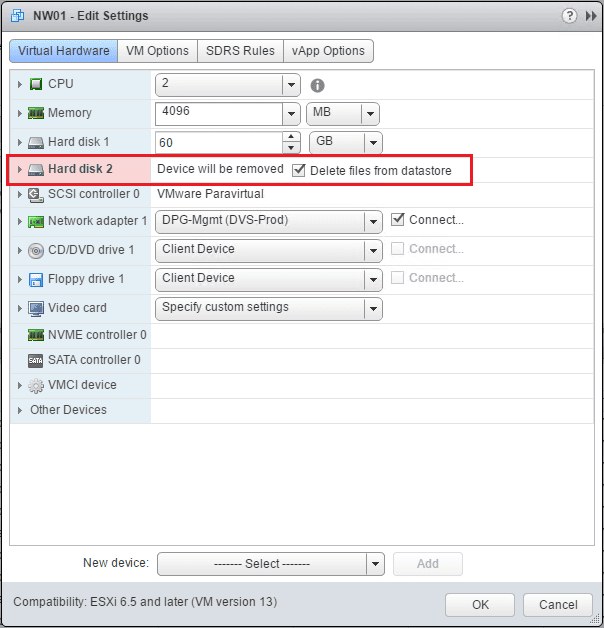
- Then delete the temporary hard drive we added.
First, on a powered on virtual machine, we add the New NVMe Controller
Next, we add a temporary hard drive and attach the new hard drive to the new NVMe controller.
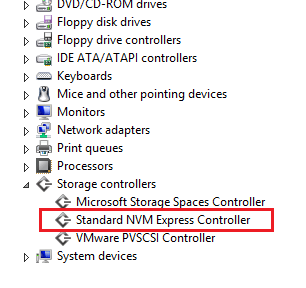
Check Device manager in the powered on virtual machine as you should see the Standard NVM Express Controller show up under Storage controllers.
Now, we can power down the virtual machine and get rid of the temporary hard drive.
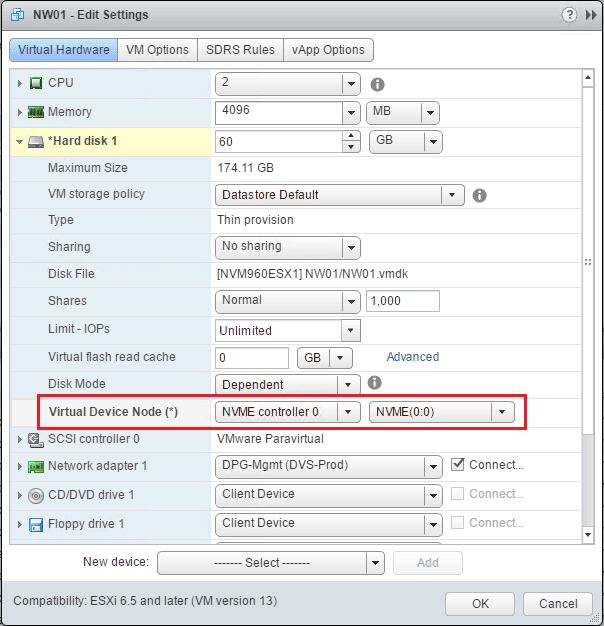
Finally, we change the boot drive to the new NVMe Controller.
The virtual machine should boot normally after the change to the new NVMe virtual controller.
.
What’s new in vSphere 6.5: Security
vSphere 6.5 is a turning point in VMware infrastructure security. What was mostly an afterthought by many IT folks only a few short years ago is now one of the top drivers of innovation for vSphere. Security has become a front and center focus of this release and I think you’ll like what we’ve come up with.
Our focus on security is manageability. If security is not easy to implement and manage then the benefit it may bring is offset. Security in a virtual infrastructure must be able to be done “at scale”. Managing 100’s or 1000’s of security “snowflakes” is something no IT manager wants to do. She/He doesn’t have the resources to do that. The key to security at scale is automation and in these new features you’ll see plenty of that.
VM Encryption
Encryption of virtual machines is something that’s been on-going for years. But, in case you hadn’t noticed, it just hasn’t “taken off” because every solution has a negative operational impact. With vSphere 6.5 we are addressing that head on.
Encryption will be done in the hypervisor, “beneath” the virtual machine. As I/O comes out of the virtual disk controller in the VM it is immediately encrypted by a module in the kernel before being send to the kernel storage layer. Both VM Home files (VMX, snapshot, etc) and VMDK files are encrypted.
The advantages here are numerous.
- Because encryption happens at the hypervisor level and not in the VM, the Guest OS and datastore type are not a factor. Encryption of the VM is agnostic.
- Encryption is managed via policy. Application of the policy can be done to many VM’s, regardless of their Guest OS.
- Encryption is not managed “within” the VM. This is a key differentiation to every other solution in the market today! There are no encryption “snowflakes”. You don’t have to monitor whether encryption is running in the VM and the keys are not contained in the VM’s memory.
- Key Management is based on the industry standard, KMIP 1.1. In vSphere vCenter is a KMIP client and works with a large number of KMIP 1.1 key managers. This brings choice and flexibility to customers. VM Keys do not persist in vCenter.
- VM Encryption makes use of the latest hardware advances inherent in the CPU’s today. It leverages AES-NI for encryption.

vMotion Encryption
This has been an ask for a long time and with 6.5 we deliver. What’s unique about vMotion encryption is that we are not encrypting the network. There are not certificates to manage or network settings to make.
The encryption happens on a per-VM level. Enabling vMotion encryption on a VM sets things in motion. When the VM is migrated, a randomly generated, one time use 256-bit key is generated by vCenter (it does not use the key manager for this key).
In addition, a 64-bit “Nonce” (an arbitrary number used only once in a crypto operation) is also generated. The encryption key and Nonce are packaged into the migration specification sent to both hosts. At that point all the VM vMotion data is encrypted with both the key and the Nonce, ensuring that communications can’t be used to replay the data.
vMotion encryption can be set on unencrypted VM’s and is always enforced on encrypted VM’s.

Secure Boot support
For vSphere 6.5 we are introducing Secure Boot support for virtual machines and for the ESXi hypervisor.
ESXI SECURE BOOT
With Secure Boot enabled, the UEFI firmware validates the digital signature of the ESXi kernel against a digital certificate in the UEFI firmware. That ensures that only a properly signed kernel boots. For ESXi, we are taking Secure Boot further adding cryptographic assurance of all components of ESXi. Today, ESXi is already made up of digitally signed packages, called VIB’s. (vSphere Installation Bundle) The ESXi file system maps to the content of those packages (the packages are never broken open).By leveraging that digital certificate in the host UEFI firmware, at boot time the already validated ESXi Kernel will, in turn, validate each VIB against the firmware-based certificate. This assures a cryptographically “clean” boot.
Note: If Secure Boot is enabled then you will not be able to forcibly install un-signed code on ESXi. This ensures that when Secure Boot is enabled that ESXi will only be running VMware digitally signed code.
VIRTUAL MACHINE SECURE BOOT
For VM’s, SecureBoot is simple to enable. Your VM must be configured to use EFI firmware and then you enable Secure Boot with a checkbox. Note that if you turn on secure boot for a virtual machine, you can load only signed drivers into that virtual machine.
Secure Boot for Virtual Machines works with Windows or Linux.

Secure Boot for Virtual Machines
Enhanced Logging
vSphere logs have traditionally been focused on troubleshooting and not “security” or even “IT operations”. This changes in vSphere 6.5 with the introduction of enhanced logging. Gone are the days where you’ll make a significant change to a virtual machine and only get a log that says “VM has been reconfigured”.
We’ve enhanced the logs and made them “actionable” by now sending the complete vCenter event such as “VM Reconfigure” out via the syslog data stream. The events now contain what I like to call “actionable data”. What I mean by that rather than just getting a notice that “something” has changed you now get what changed, what it changed from and what it changed to. This is data that I can “take action” against.
In 6.5, you will get a descriptive log of the action. For example, if I add 4GB of memory to a VM that has 6GB today, I’ll see a log that tells me what the setting was and what the new setting is. In a security context, if you move a VM from the vSwitch labeled “PCI” to the vSwitch labeled “Non-PCI” you will get a clear log describing that change. See the image below for an example.

Enhanced/Actionable Logging
Solutions like VMware Log Insight will now have a lot more data to display and present but more importantly, more detailed messages mean you can create more prescriptive alerts and remediation’s. More informed solutions help make more informed critical datacenter decisions.
Reference
Configure Encrypted VMs in VMware vSphere 6.5
Encryption on vSphere 6.5
One of the new exciting features that was introduced with vSphere 6.5 is the encrypted VMs feature. Security these days is on everyone’s mind and encryption provides a solution to many security concerns. If someone gets a copy of the raw VMDKs of a sensitive VM,they can easily take those files by mount it on their on VMware server and have access to the data. Those files are worthless without the encryption key provided by the encryption key server. Also, the encrypted VMs feature allows for encrypted vMotion.
VMware vSphere 6.5 Configure Encrypted VMs
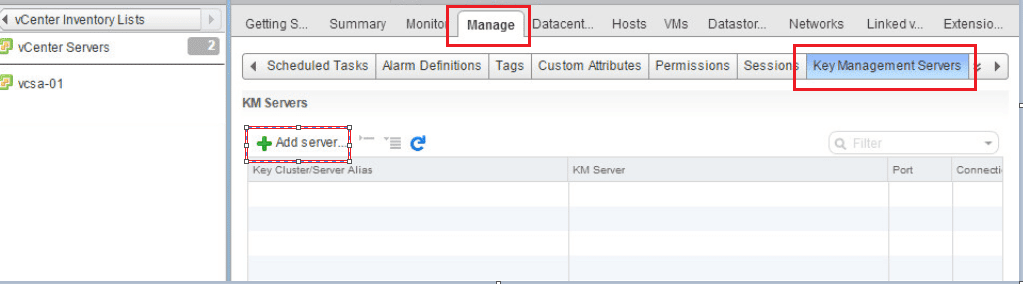
The first step in deploying Encrypted VMs is to point vCenter to a Key Management Server. In your vCenter server inventory list, click Manage >> Key Management Servers >> Add Server.
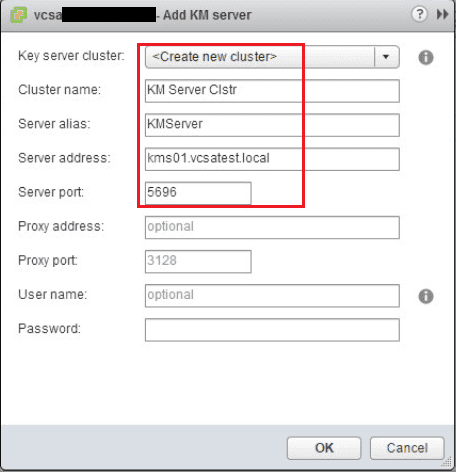
Fill in the information for your cluster name, server alias, server address, and server port.
Once you click OK you will see a security dialog asking you to trust the certificate.
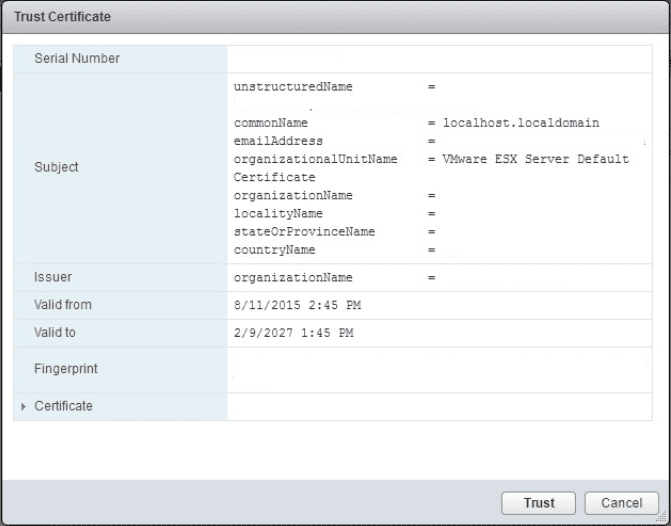
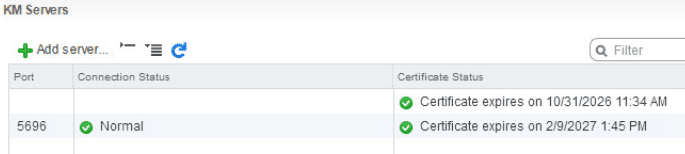
Once added, you should have green checkboxes next to the Certificate status.
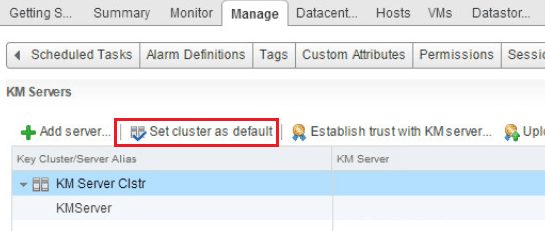
Now under KM Servers we set a default cluster.
Creating an Encryption Storage Policy
The next step in the process is to setup an encryption storage policy.
Add a storage policy.

Name the policy.
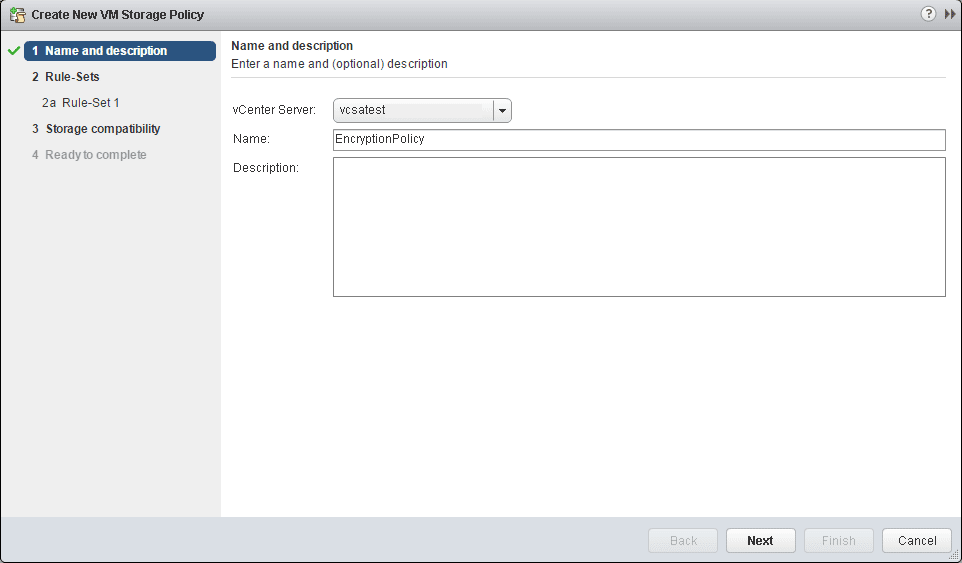
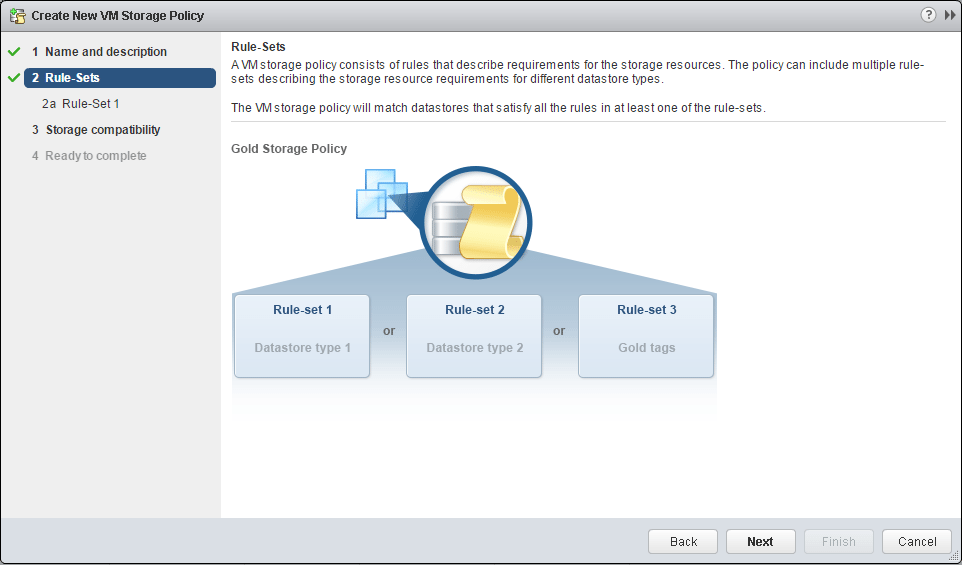
Simply next through the next informational page.
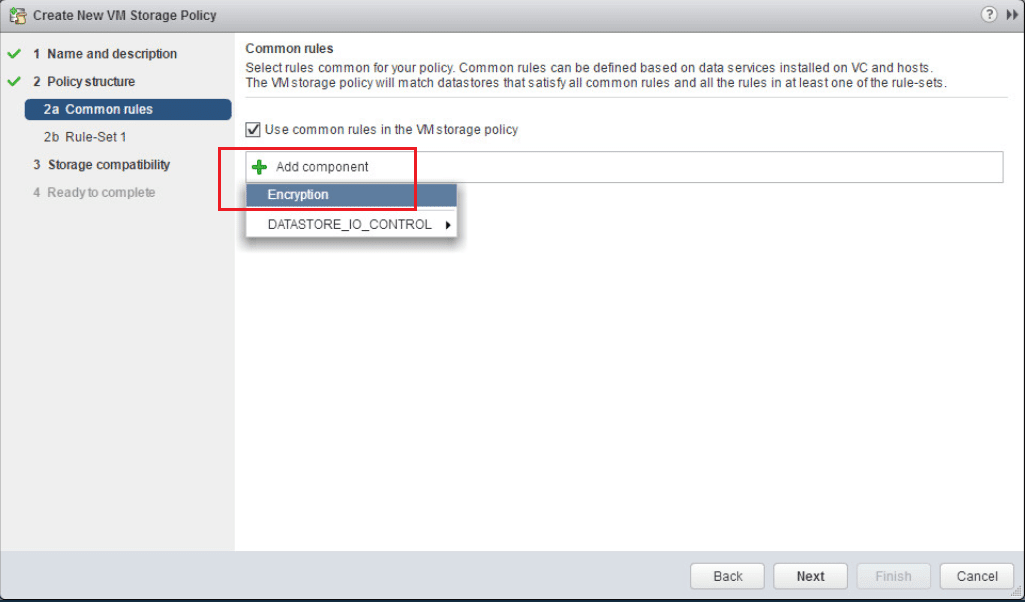
Under common rules, click the Use common rules in the VM storage policy. Then select to Add Component. Then select the Encryption option from the dropdown, but don’t click next yet.
Under the Add Rule select the vmcrypt option.
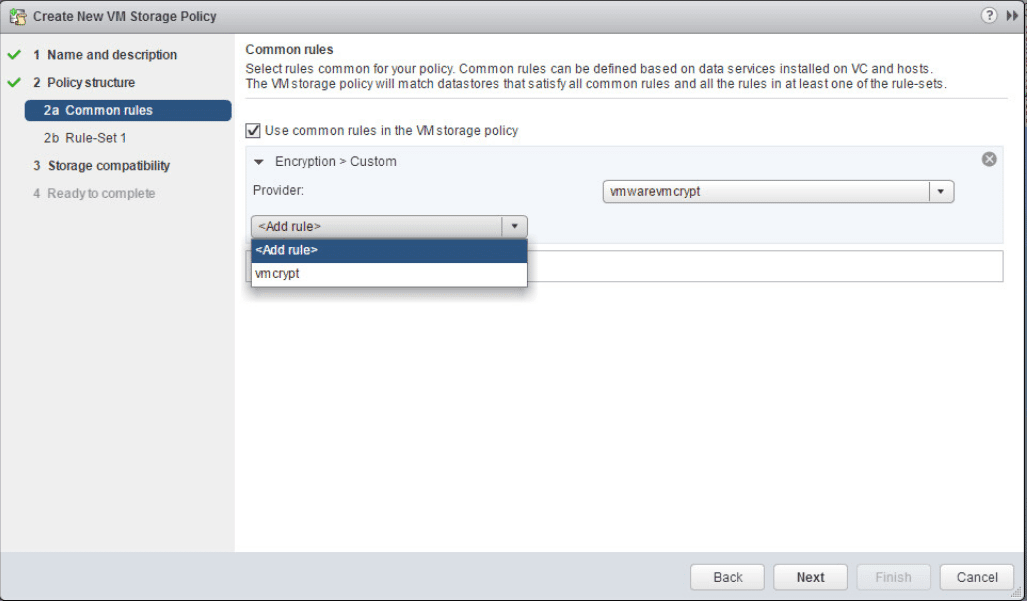
Leave the Allow I/O filters before encryption set to false.
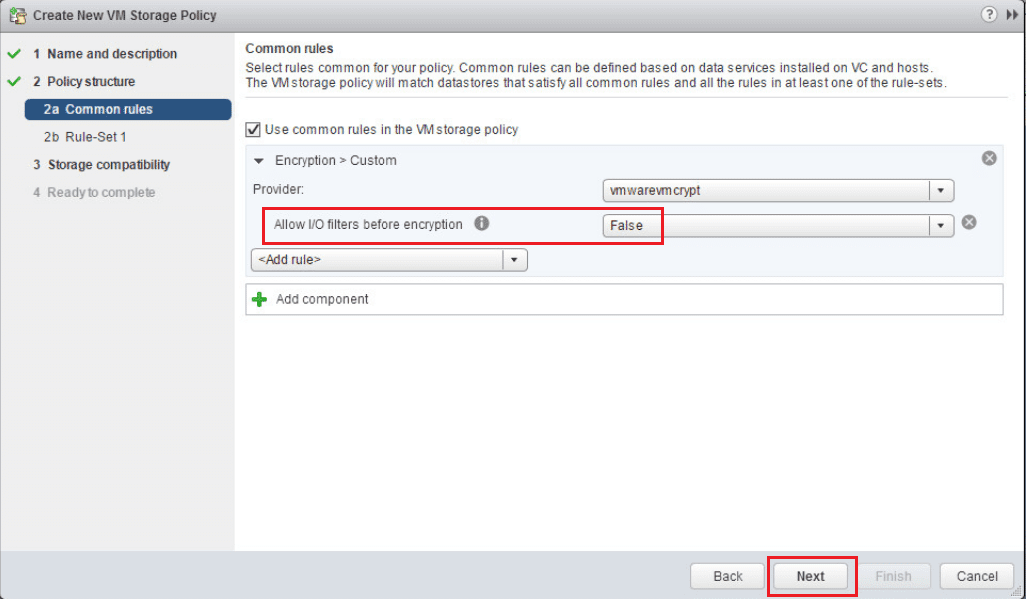
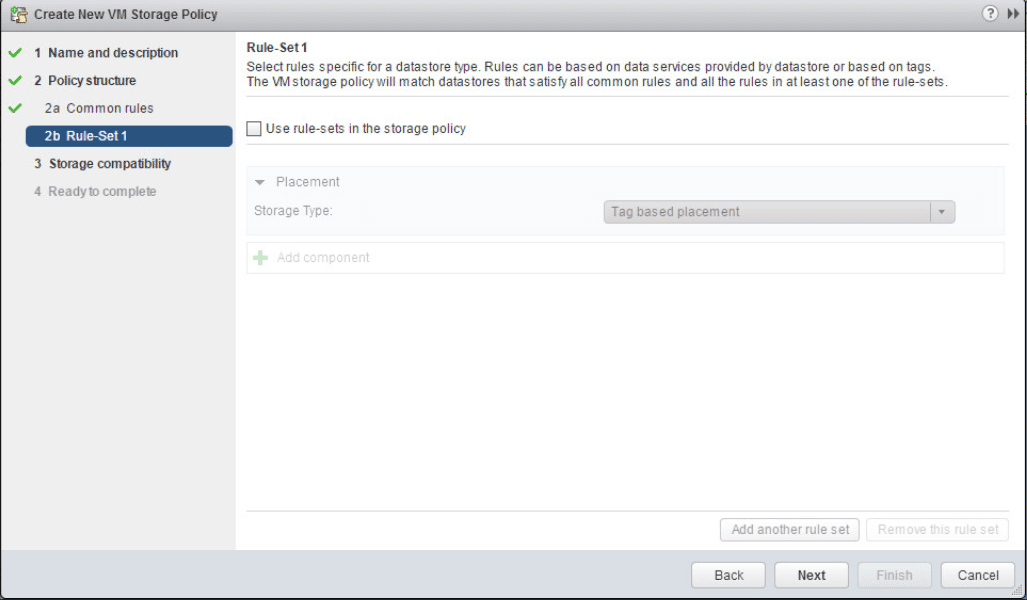
Uncheck the Use rule-sets in the storage policy.
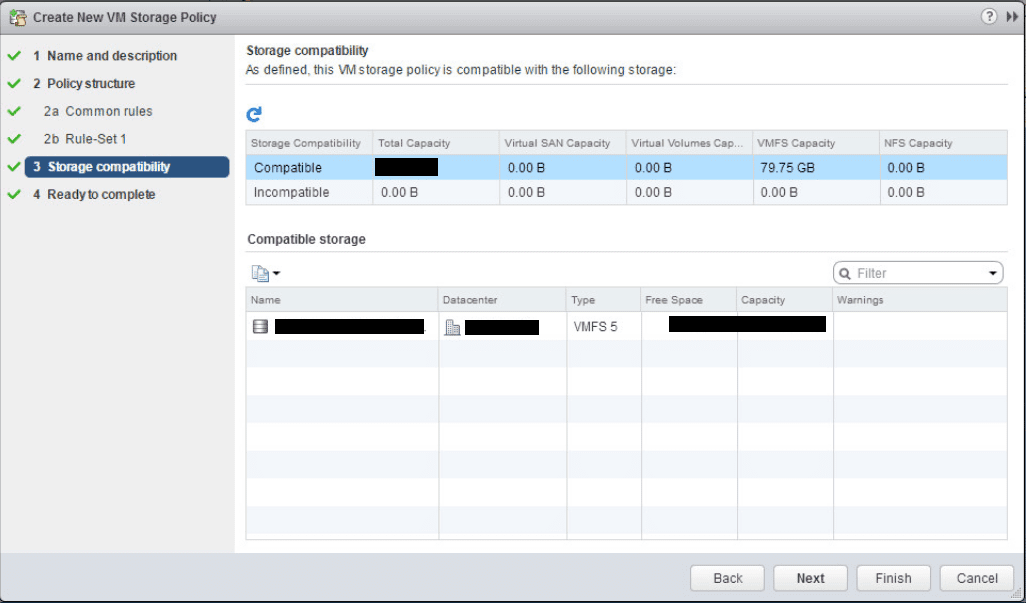
The next screen shows the storage compatibility check.
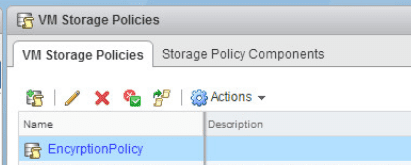
Click Finish to create the encryption storage policy.
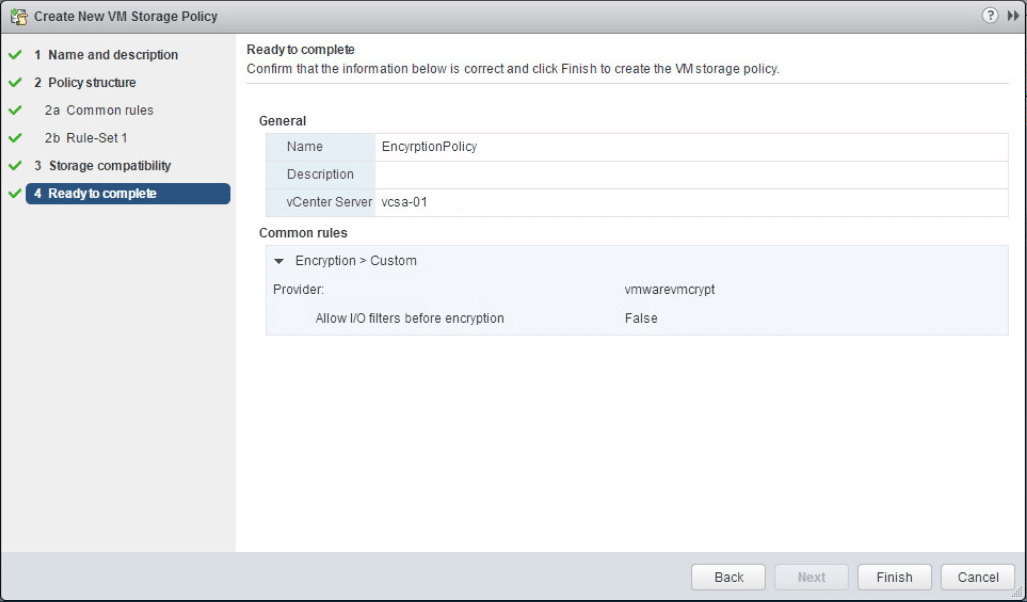
We can now see our EncryptionPolicy listed in the available VM storage policies.
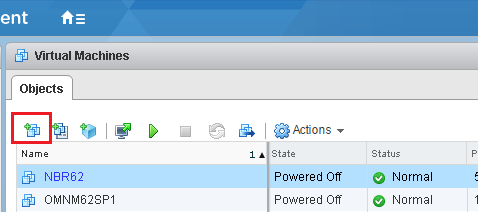
Create an Encrypted VM
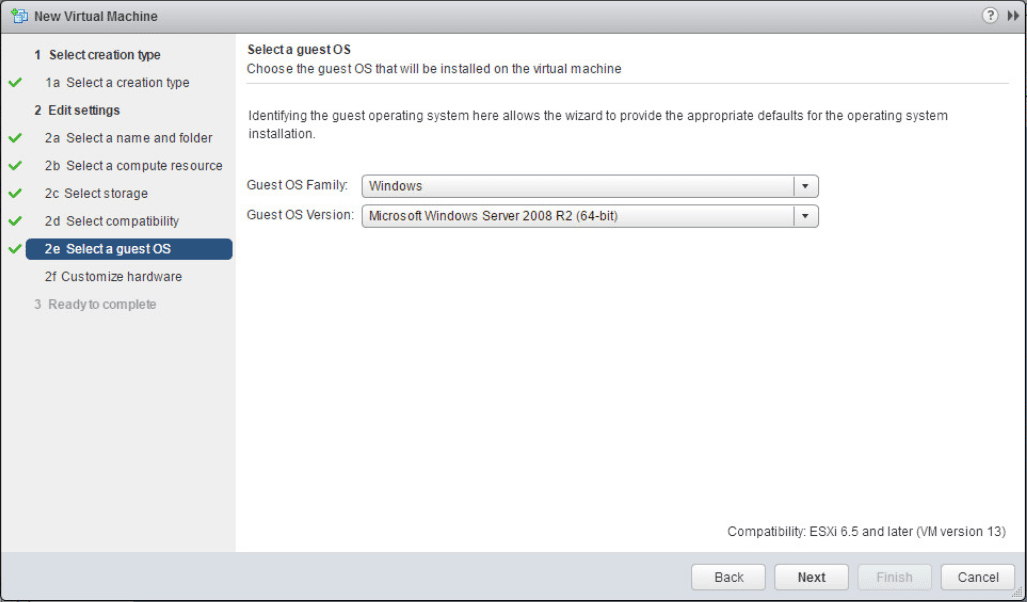
The last step is to actually create an encrypted VM.

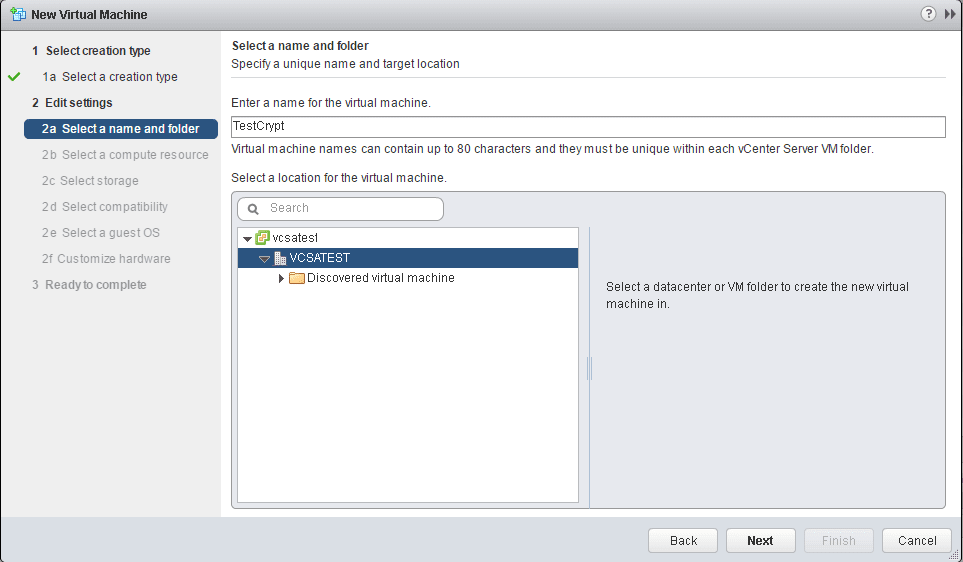
Select the name and folder.
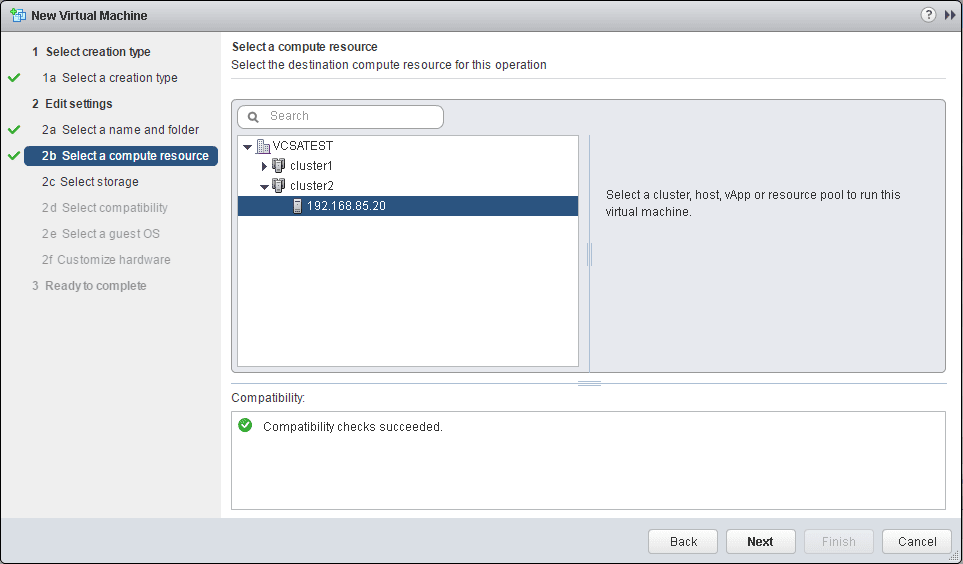
Select a compute resource.
Here is where the new options come into play. We can now select our Encryption Policy from the VM storage policy dropdown.
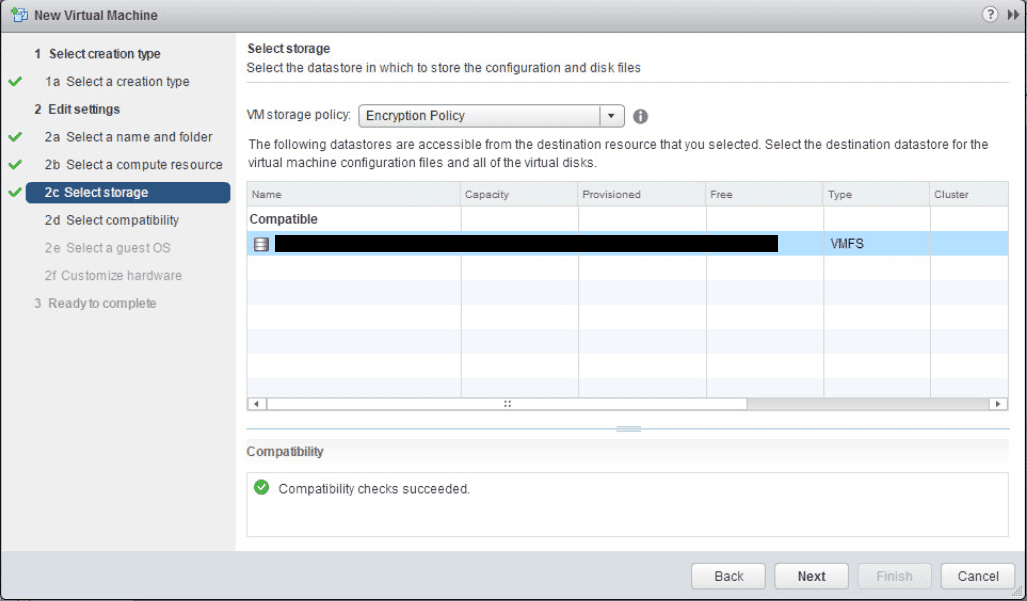
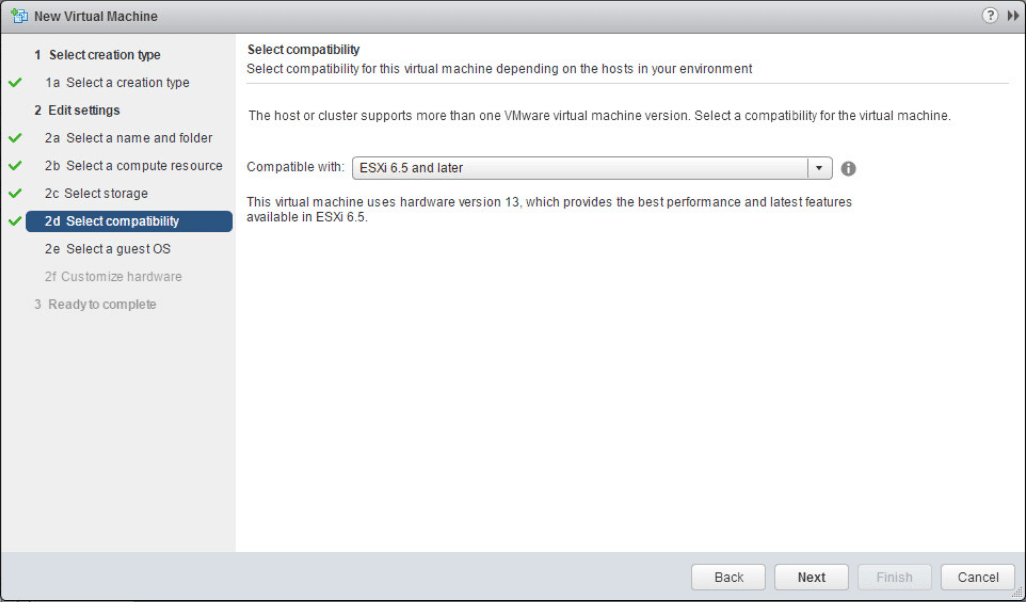
Leave the compatible with setting set to ESXi 6.5 and later.
When you expand the hard disk for the VM, notice how the VM storage policy shows the Encryption Policy.
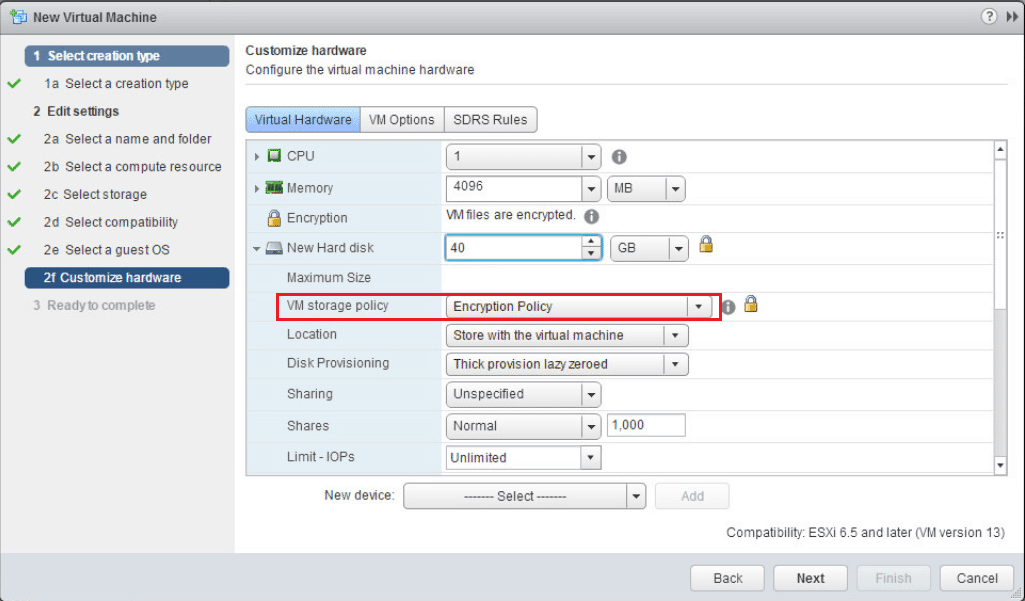
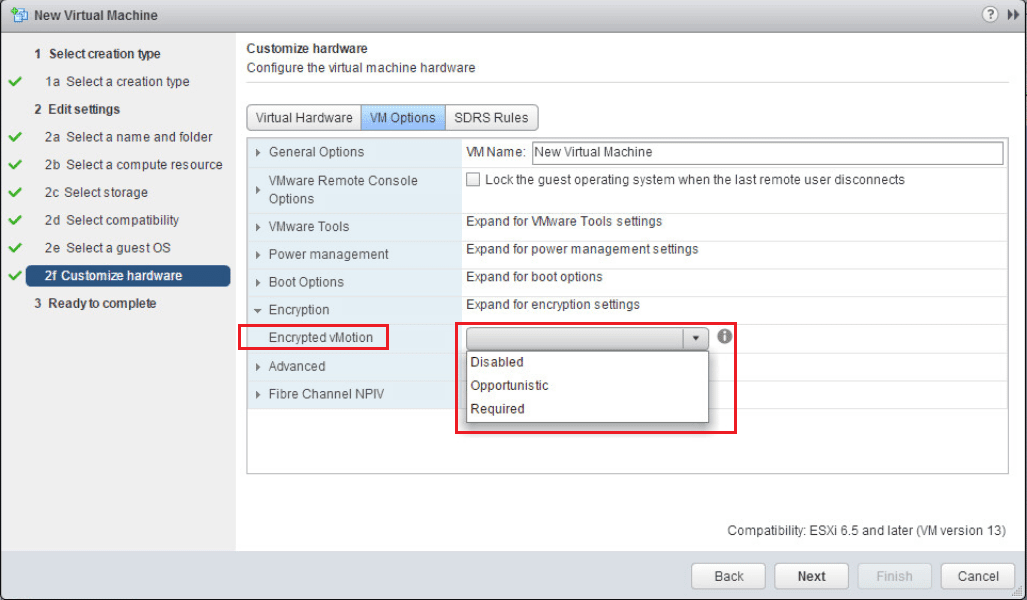
Also, a really cool feature is Encrypted vMotion. We can set the setting here to determine how the VM handles vMotion to another host. There are three options here:
- Disabled – Do not use encrypted vMotion
- Opportunistic – Use encrypted vMotion if the destination host supports it, otherwise use normal vMotion
- Required – The vMotion process with this VM must use encrypted vMotion. If the vMotion operation doesn’t support encryption on the destination host, the vMotion operation will fail.
After the above configuration screen, simply hit Next and Finish at the Summary screen.
Subscribe to:
Posts (Atom)